Due to their energy-saving, high efficiency, and flexible installation, individually controlled LED strips are widely used in general lighting, decorative lighting, audio-visual lighting, advertising signs, and other fields. We can see LED light strips on various occasions, such as retail stores, nightclubs, concerts, and hotels and bridges are often seen installed with LED light strips.
Table of Contents
What is addressable LED strip
In the early days, LED strips used simple resistors or PWM technology to adjust brightness, but cannot achieve complex effects. With tech development, IC control is applied to LED strips for diverse effects. Most of the current LED strips use digital IC control, such as common WS2811, WS2812, WS2813, and SK6812.
Next, this article will guide you to know about how to use addressable RGB LED strip from connect, wire, and control aspects.
Control, connect and wire WS2811 LED strip
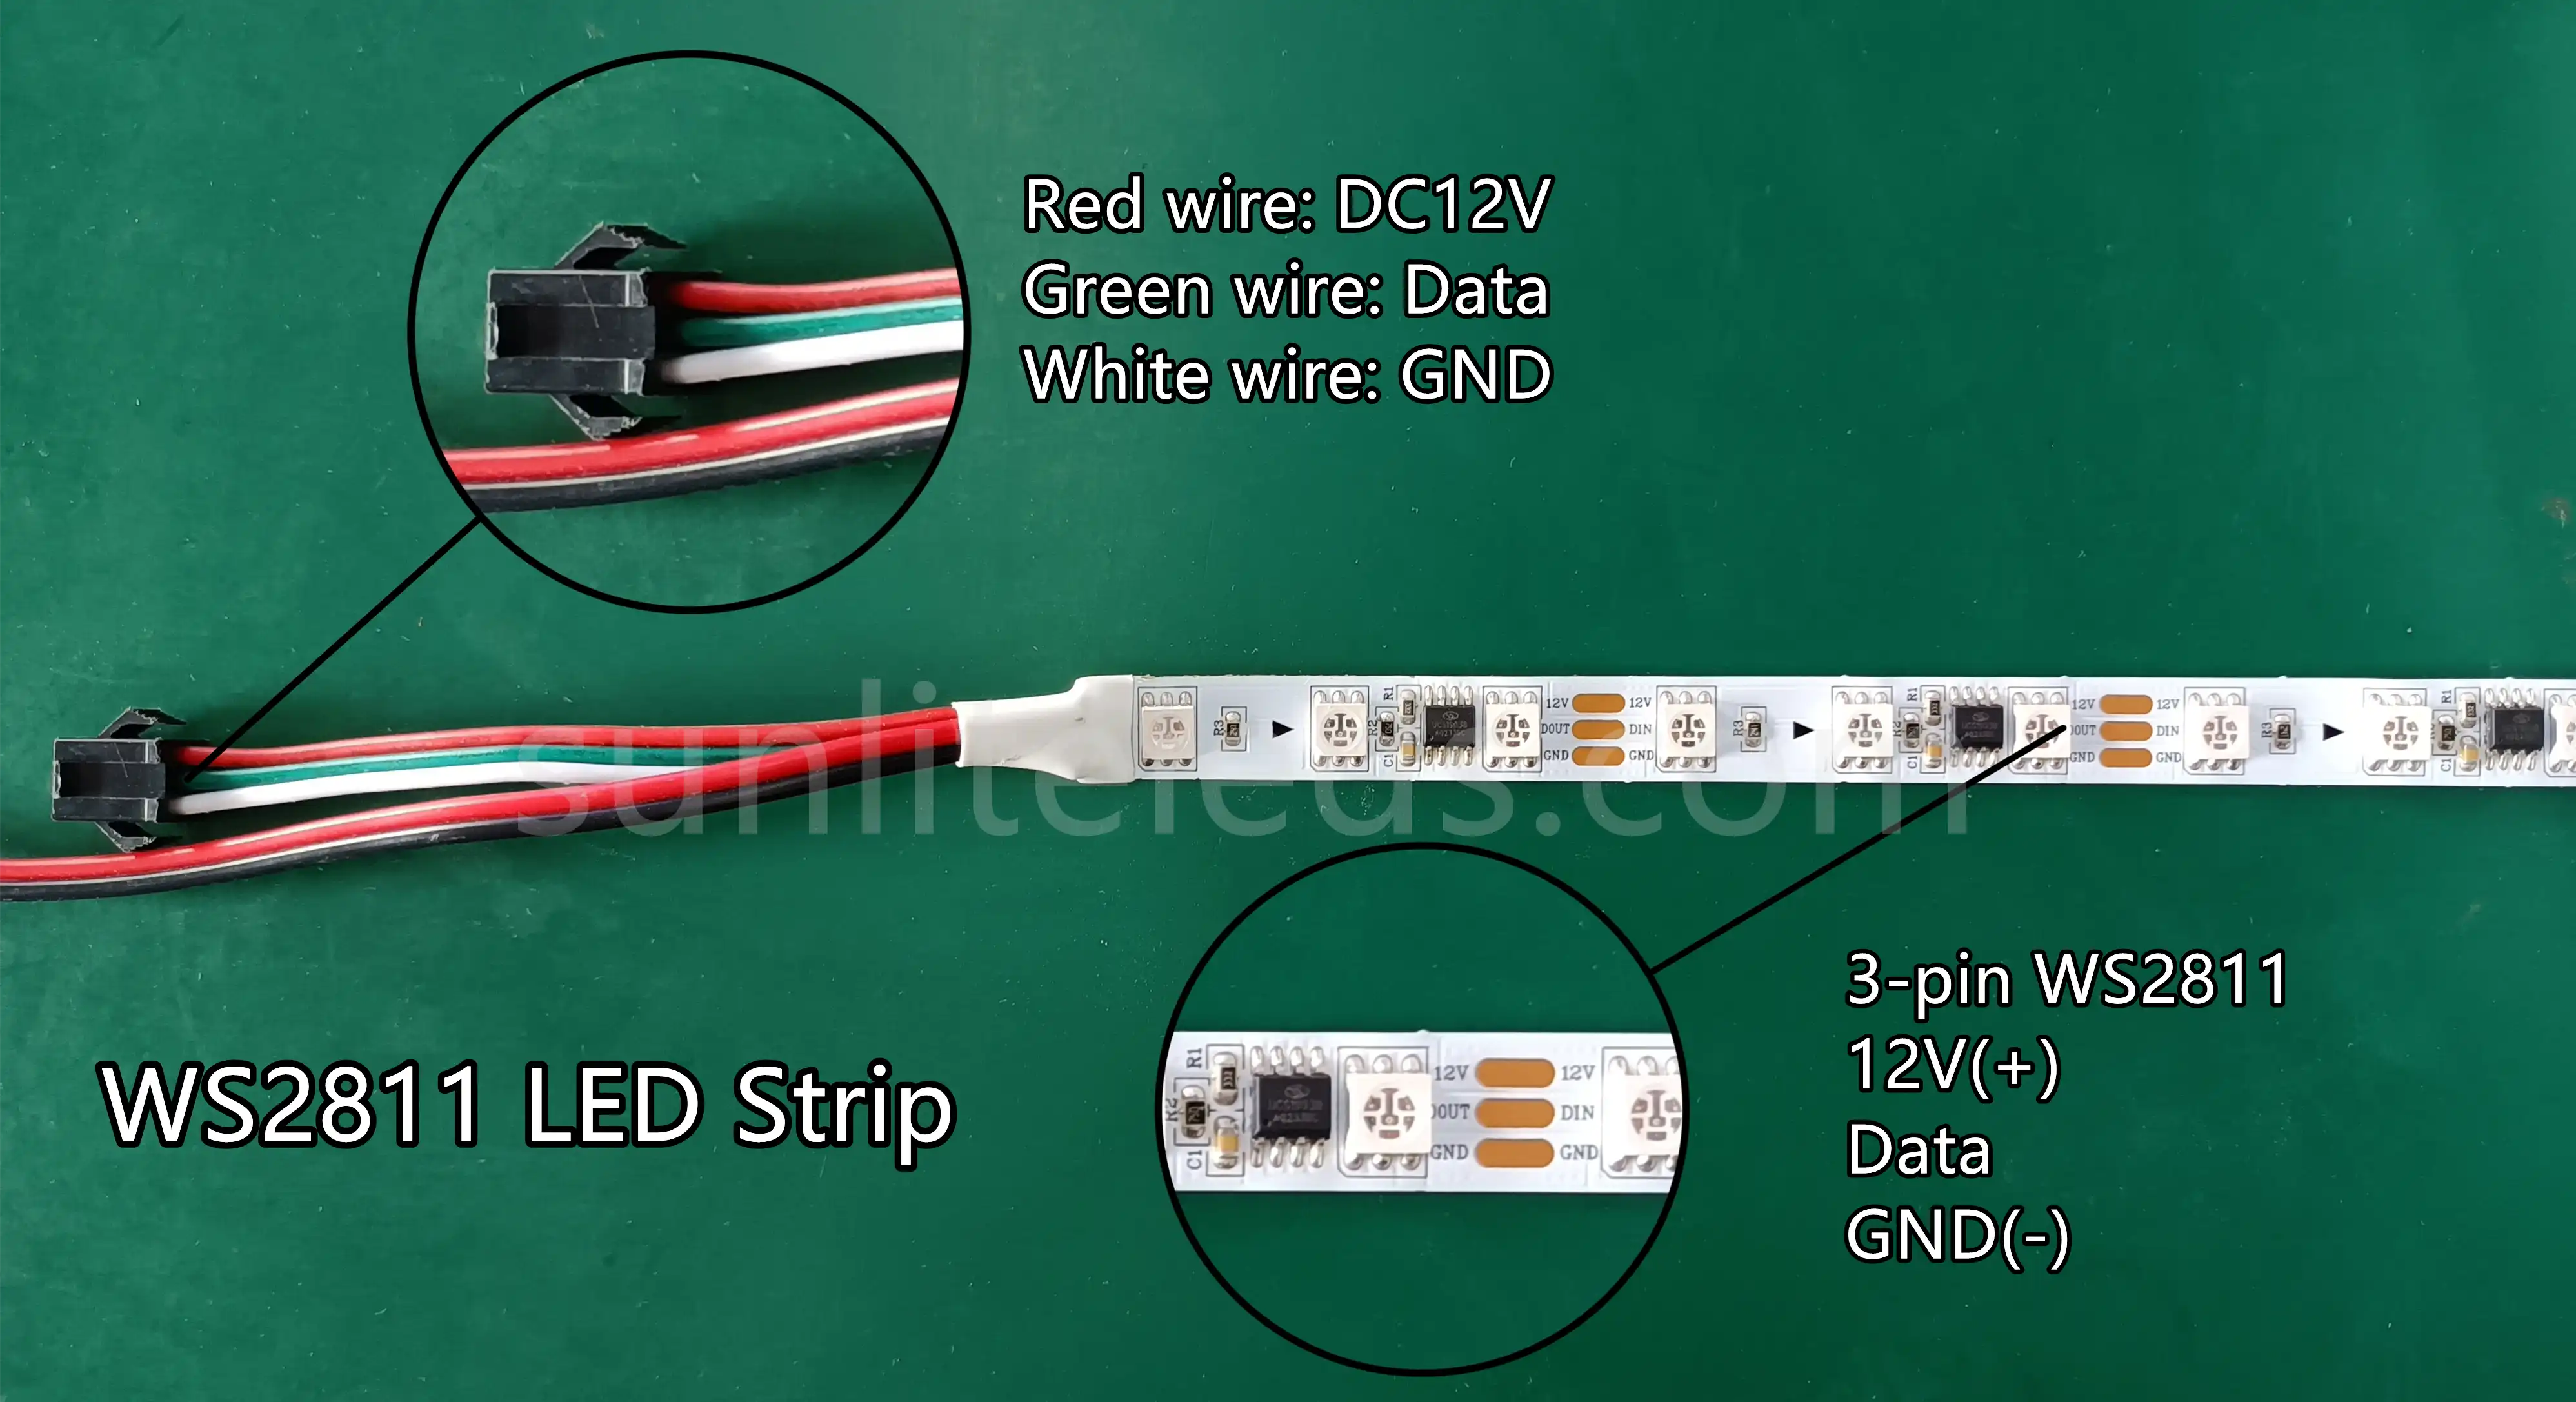
WS2811 LED strip is the most widely promoted and used addressable LED strip on the market. It has 3 wires for power and data transfer, V+, Data, and GND. The connection and control of WS2811 light strip is relatively simple, and those who are new to pixel lighting can easily learn to operate.
Below picture shows the details of a DC12V WS2811 RGB LED strip. Click the picture below to get more details about WS2811 LED Strip
Wire
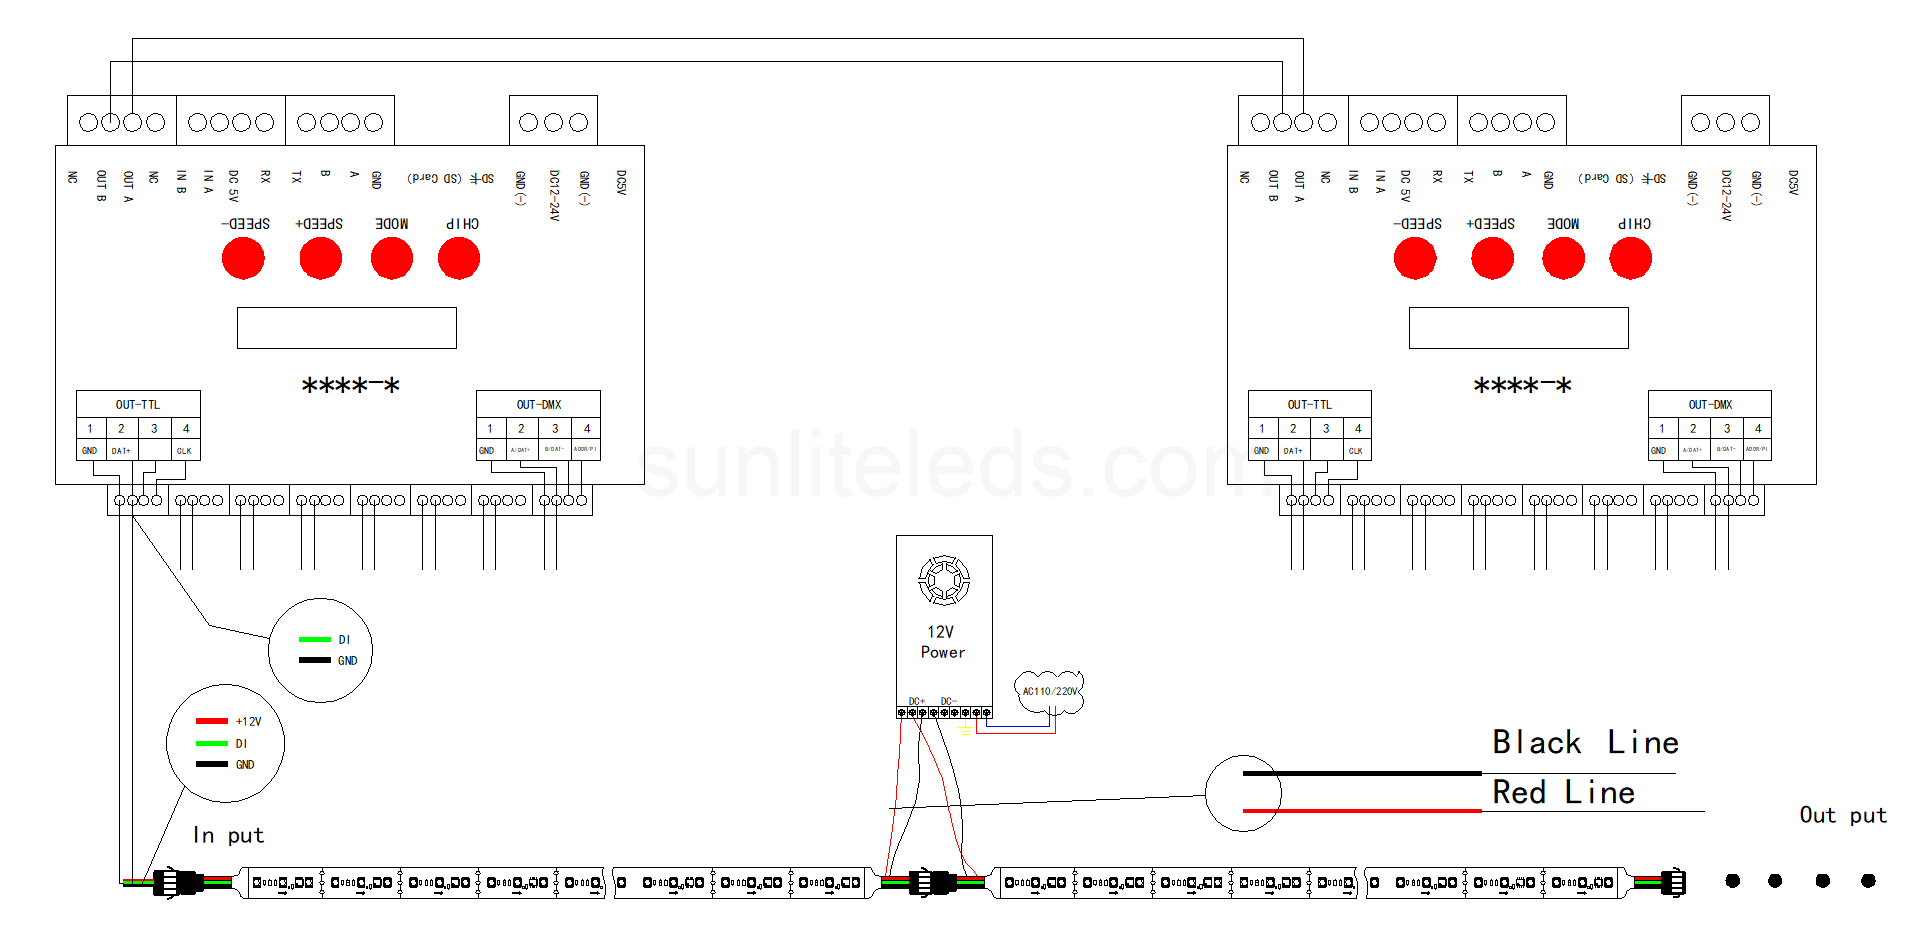
The below picture is a wiring diagram of the DC12V WS2811 RGB LED strip.
Connect
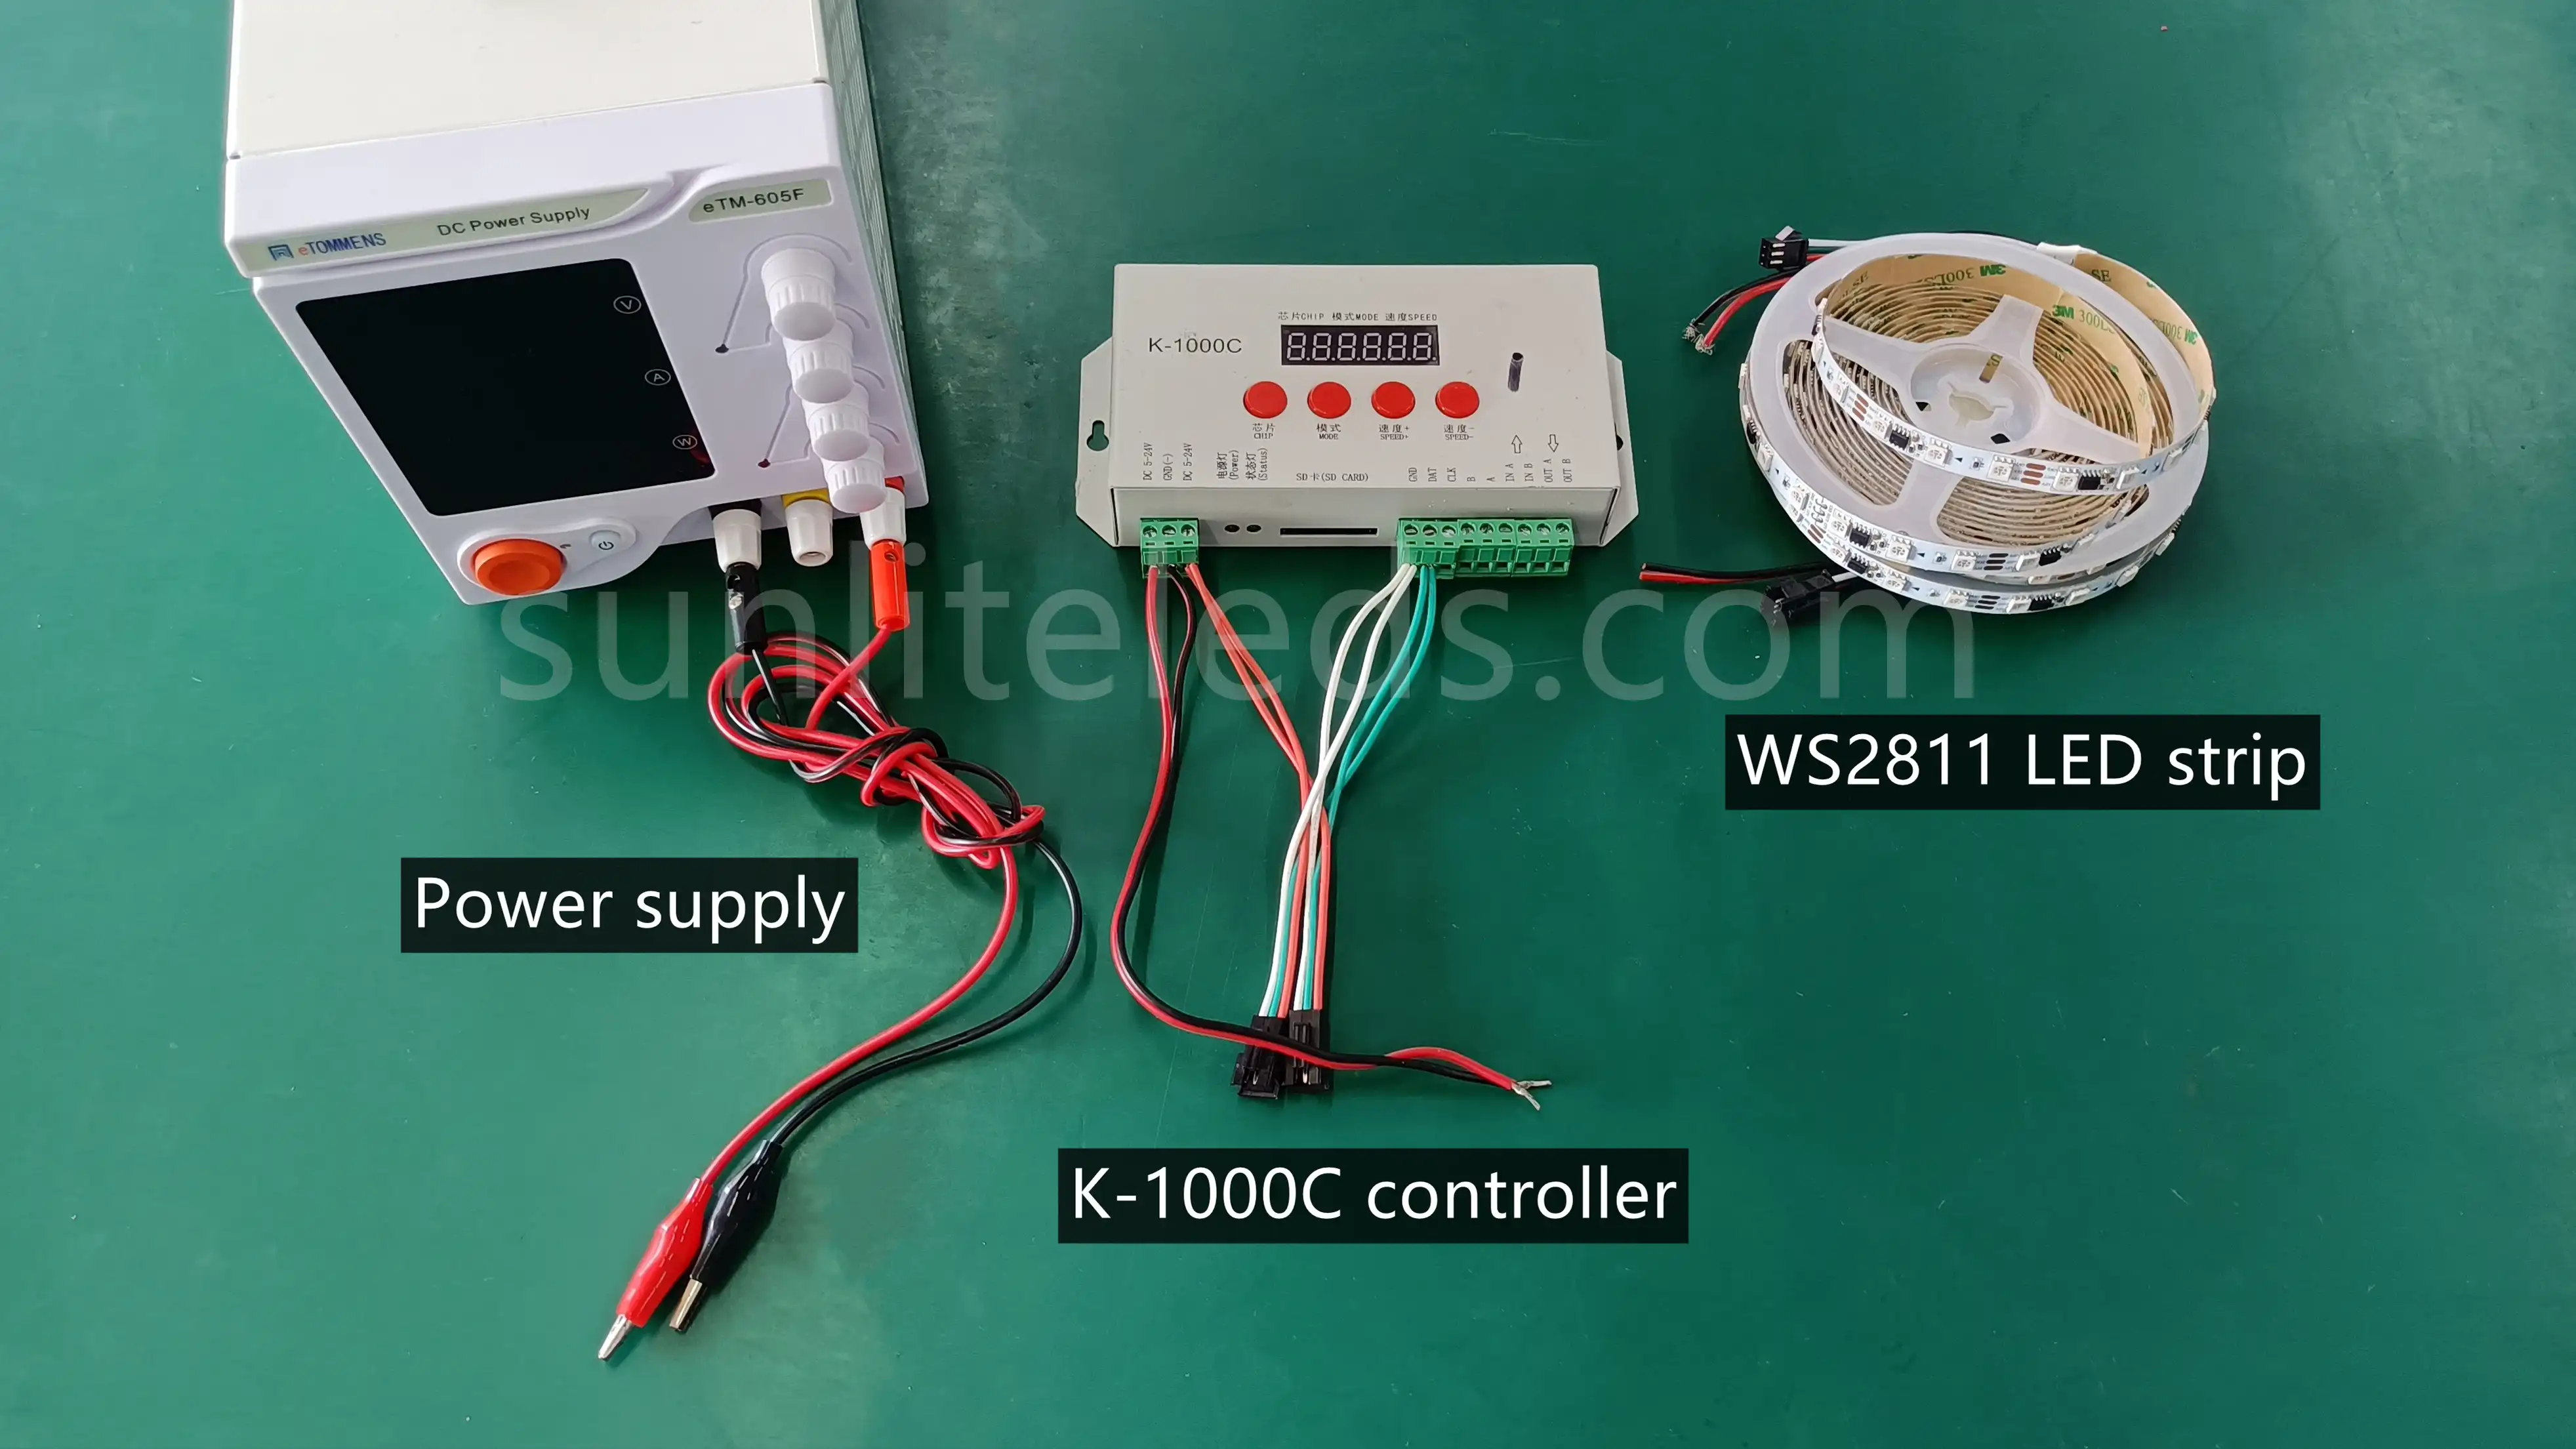
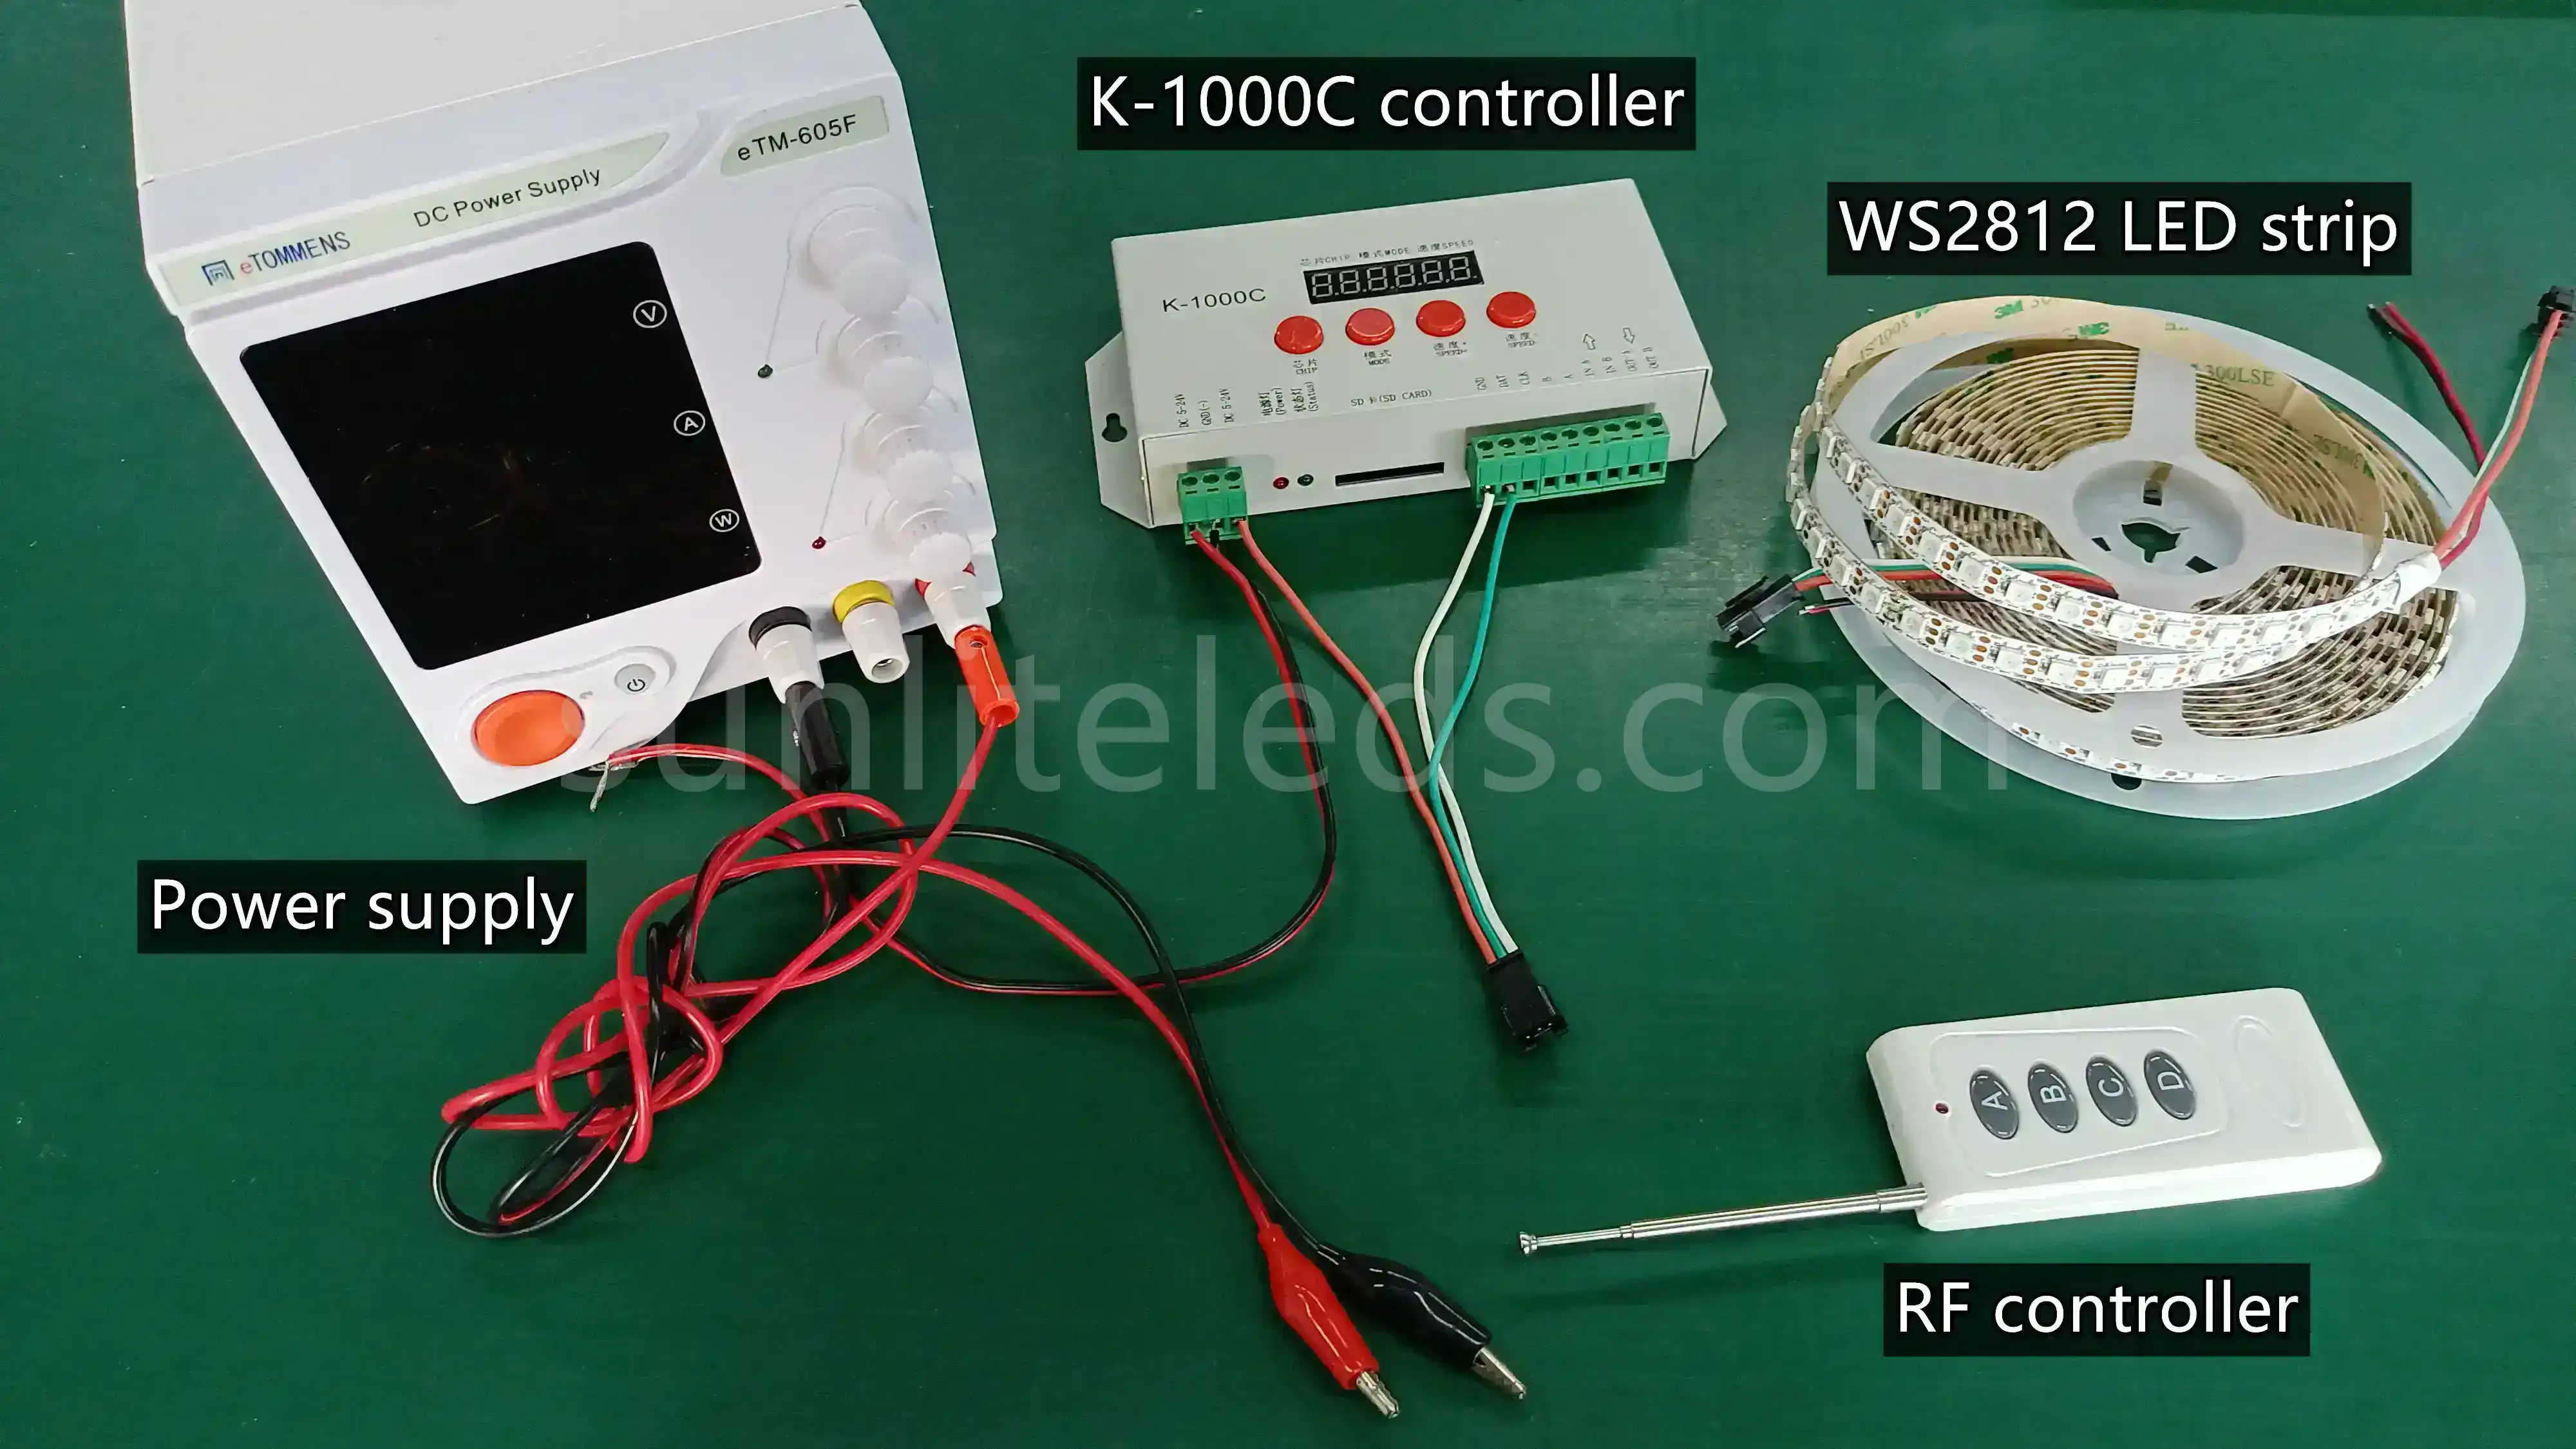
First step: We need to prepare the required equipment, mainly the WS2811 light strip, power supply, and controller. Now we prepared an adjustable voltage power supply, a K-1000C controller, and a roll of DC12V WS2811 RGB LED strip.
Second step: Connect one end of the power wire and the JST connector with the controller. Connection as the below picture shows:
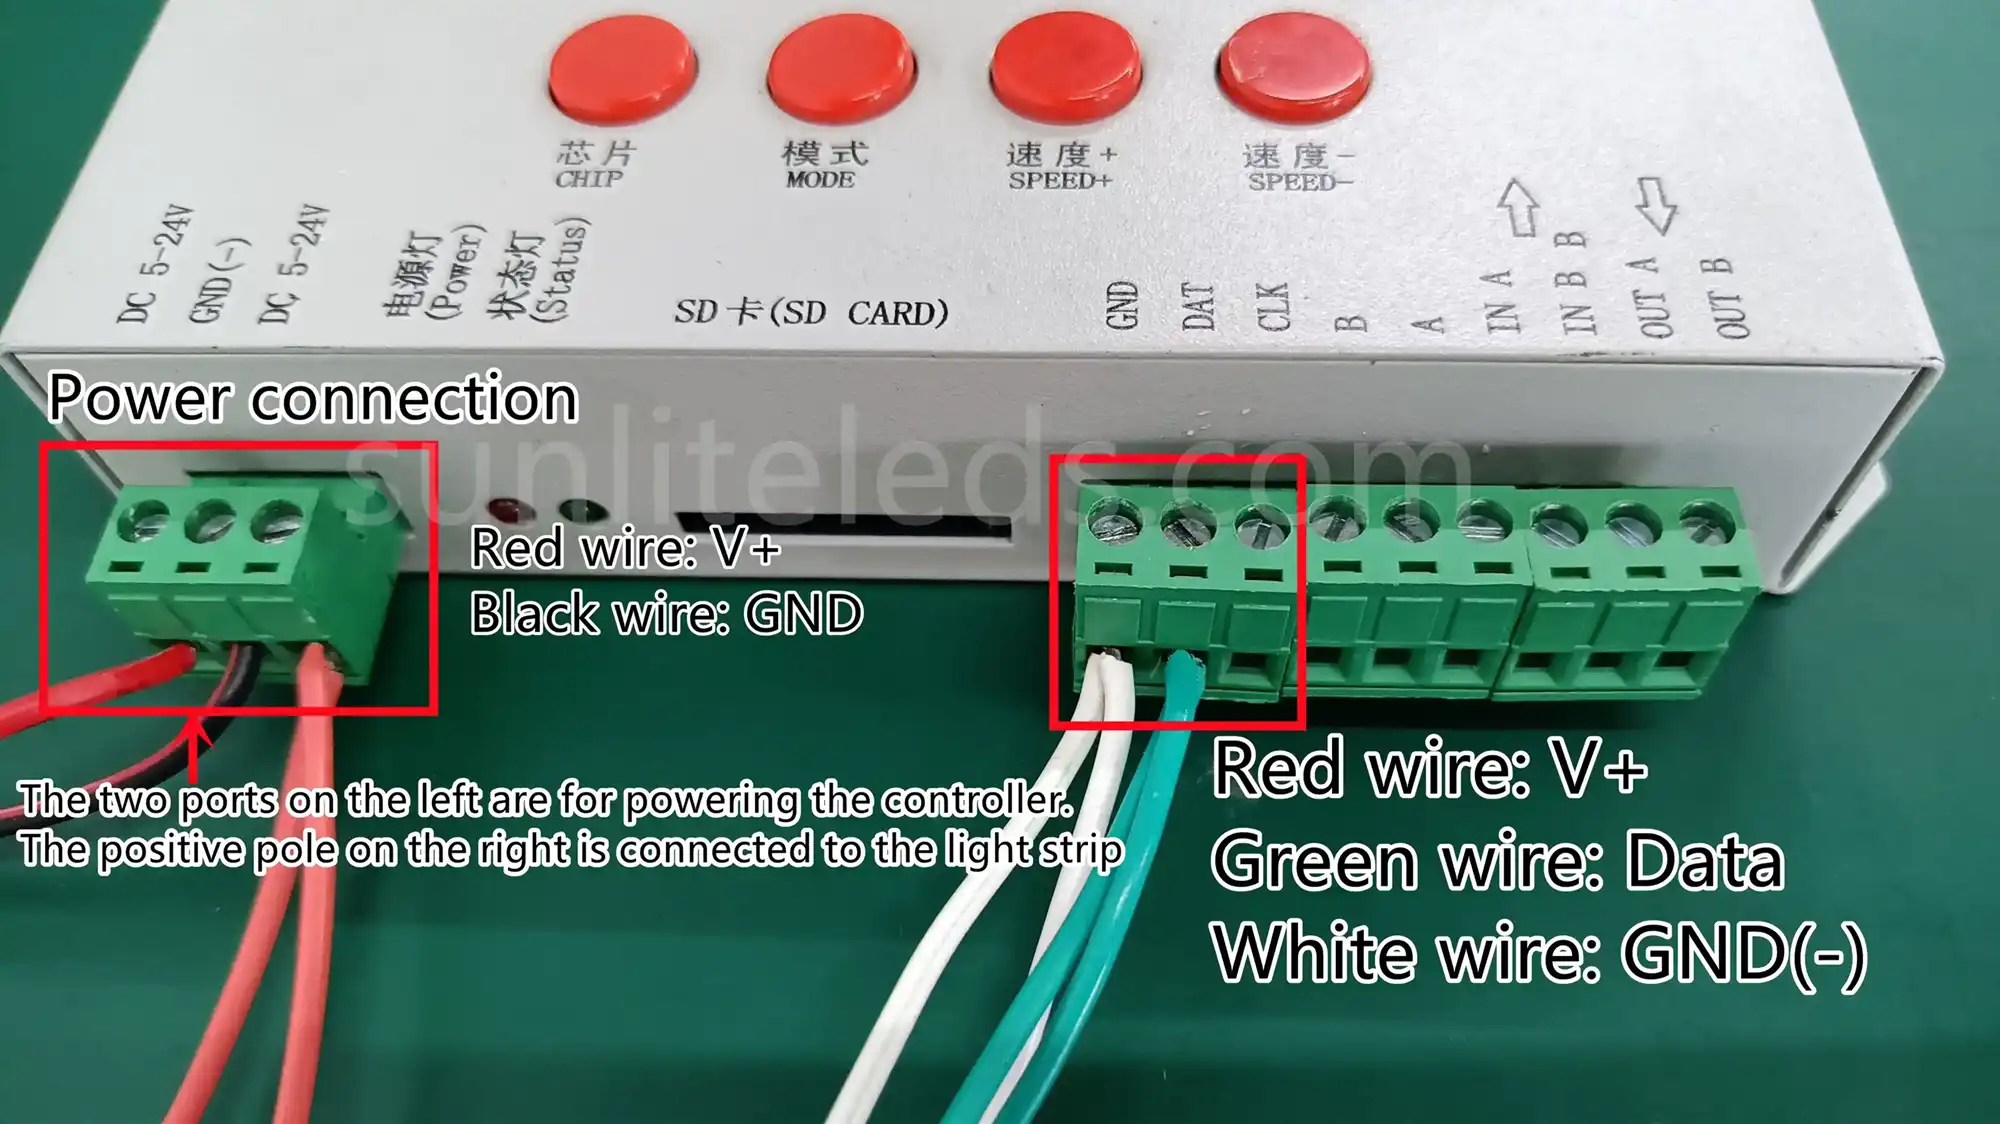
Third step: Connect the controller to power supply. Note that the red wire is V+ and the black wire is GND.
Fourth step: Connect the WS2811 LED strip to the controller. Please pay attention to the direction of data transmission before connection to avoid reverse signal connection. (If the data transmission of the WS2811 light strip is reversed, it will cause damage to the ICs and LED beads.)

Control
By now, the connecting part is done. Adjust the power supply to the appropriate voltage, and then press the power switch. With the K-1000C controller, we can adjust the lighting mode and speed by directly pressing the keys on the controller, or using an RF remote controller to achieve.
There are many control methods for WS2811 LED strips. The above connection demo shows the K-1000C offline control, and it can use PC for online control, master controller + slave controller control, mobile phone APP control, etc.
Control, connect and wire WS2812 LED strip
WS2812 LED strip is a built-in IC RGB LED strip that can be controlled individually and is widely used in commercial decoration lighting, stage dynamic lighting, and game atmosphere lighting.
The WS2812 LED strip is a 3-wire strip that includes V+, data, and GND. You can see the strip details in the picture below:
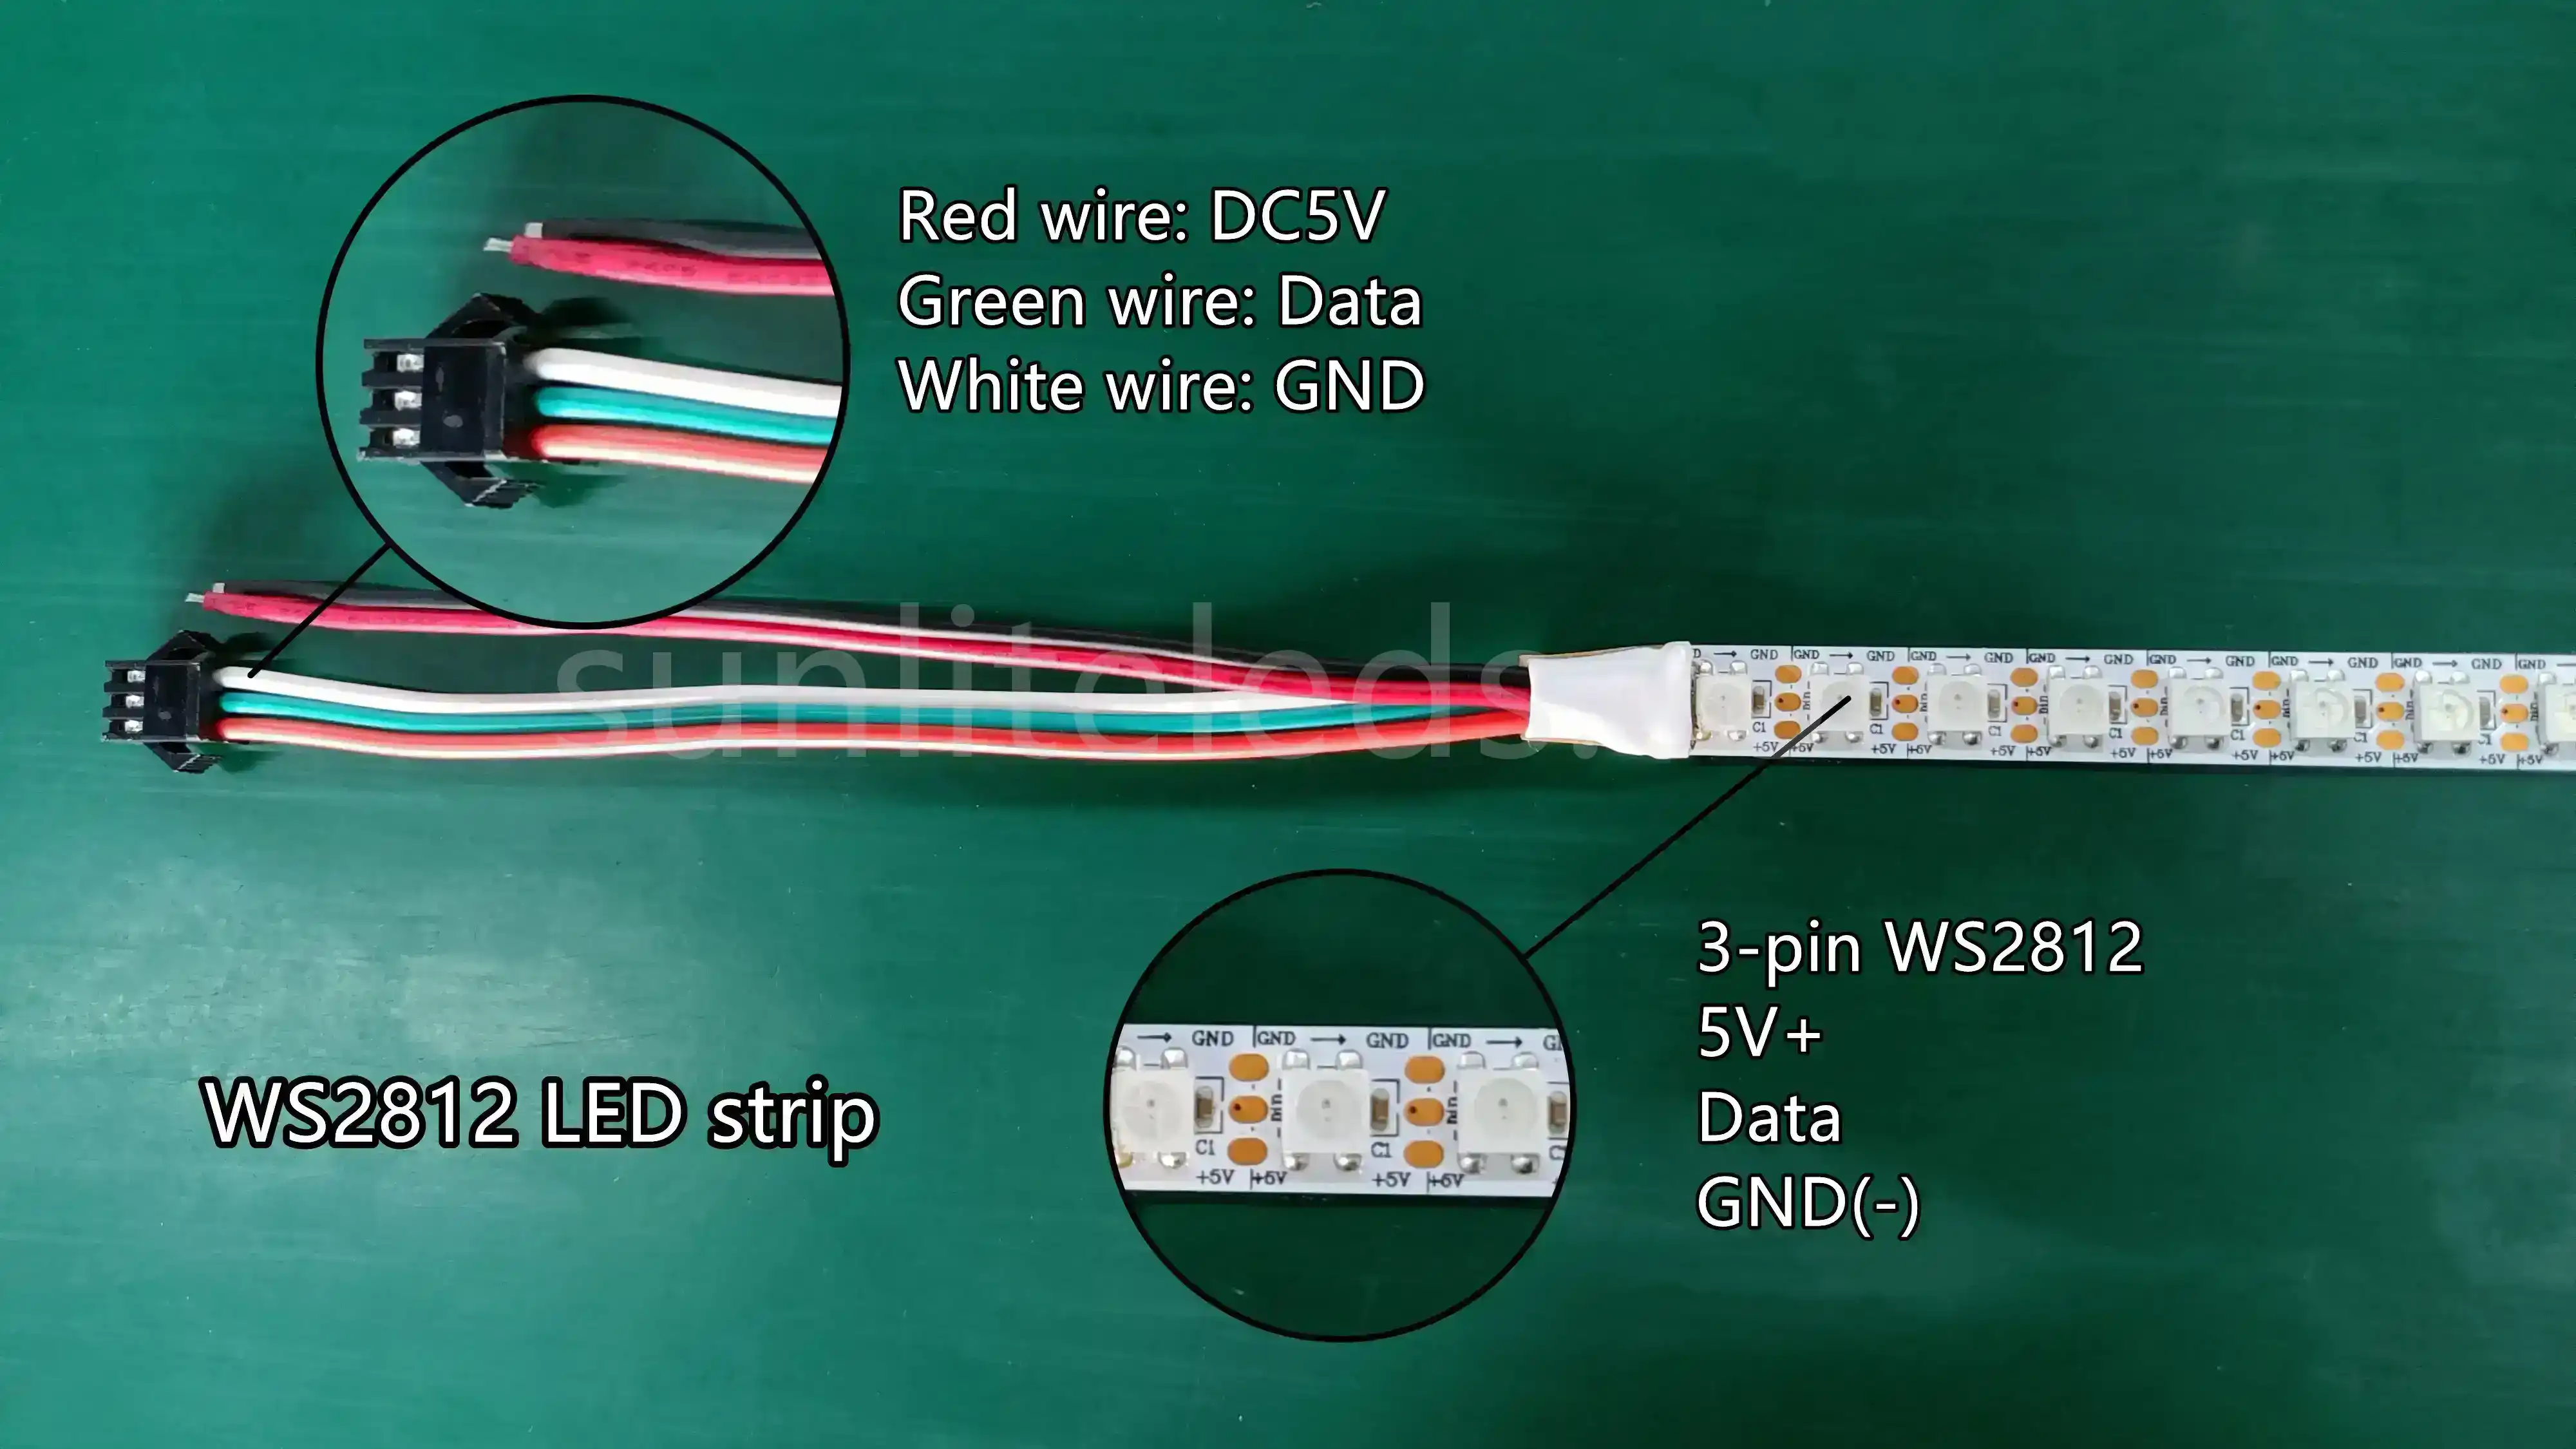
Wire
Below is the wiring diagram of the WS2812 RGB LED strip connect with the offline K-1000C LED controller.
Connect
First, prepare all the connection devices ready. For demonstration, we prepared an adjustable voltage power supply, K-1000C controller, and a roll of WS2812 RGB LED strip. The video below shows how we connect and control this digital LED strip.
Second, connect the power cord and LED strip connector to the controller. You can refer to the picture below for wiring.
Third, connect the controller to the power source. About how to power WS2812B LED strip: Connect the red wire to the positive pole and the black wire to the negative pole.
Fourth, connect WS2812B LED strip to K-1000C. Please pay attention to the signal direction on the light strip. If the signal is reversed, it will cause damage to IC and LED.

Now, we have completed the LED strip connection part. Adjust the power source to DC5V and light up the strip.
Control
We have displayed how to control WS2812B individually addressable LED strip with K-1000C in the above demonstration video. And you can control WS2812 strip lights with different controllers according to the actual application scenarios, such as K-8000C, T-790K, and YC3000A. Besides, you can program and control by connecting with PC control.
Control, connect and wire WS2813 LED strip
WS2813 LED strip is a built-in IC RGB LED strip with dual wires signal transmission, and it has individual control and break continue functions. The WS2813 addressable LED strip has 4 wires to transmit power and signal, and they are: DC5V wire, main data wire, backup data wire, and GND wire.
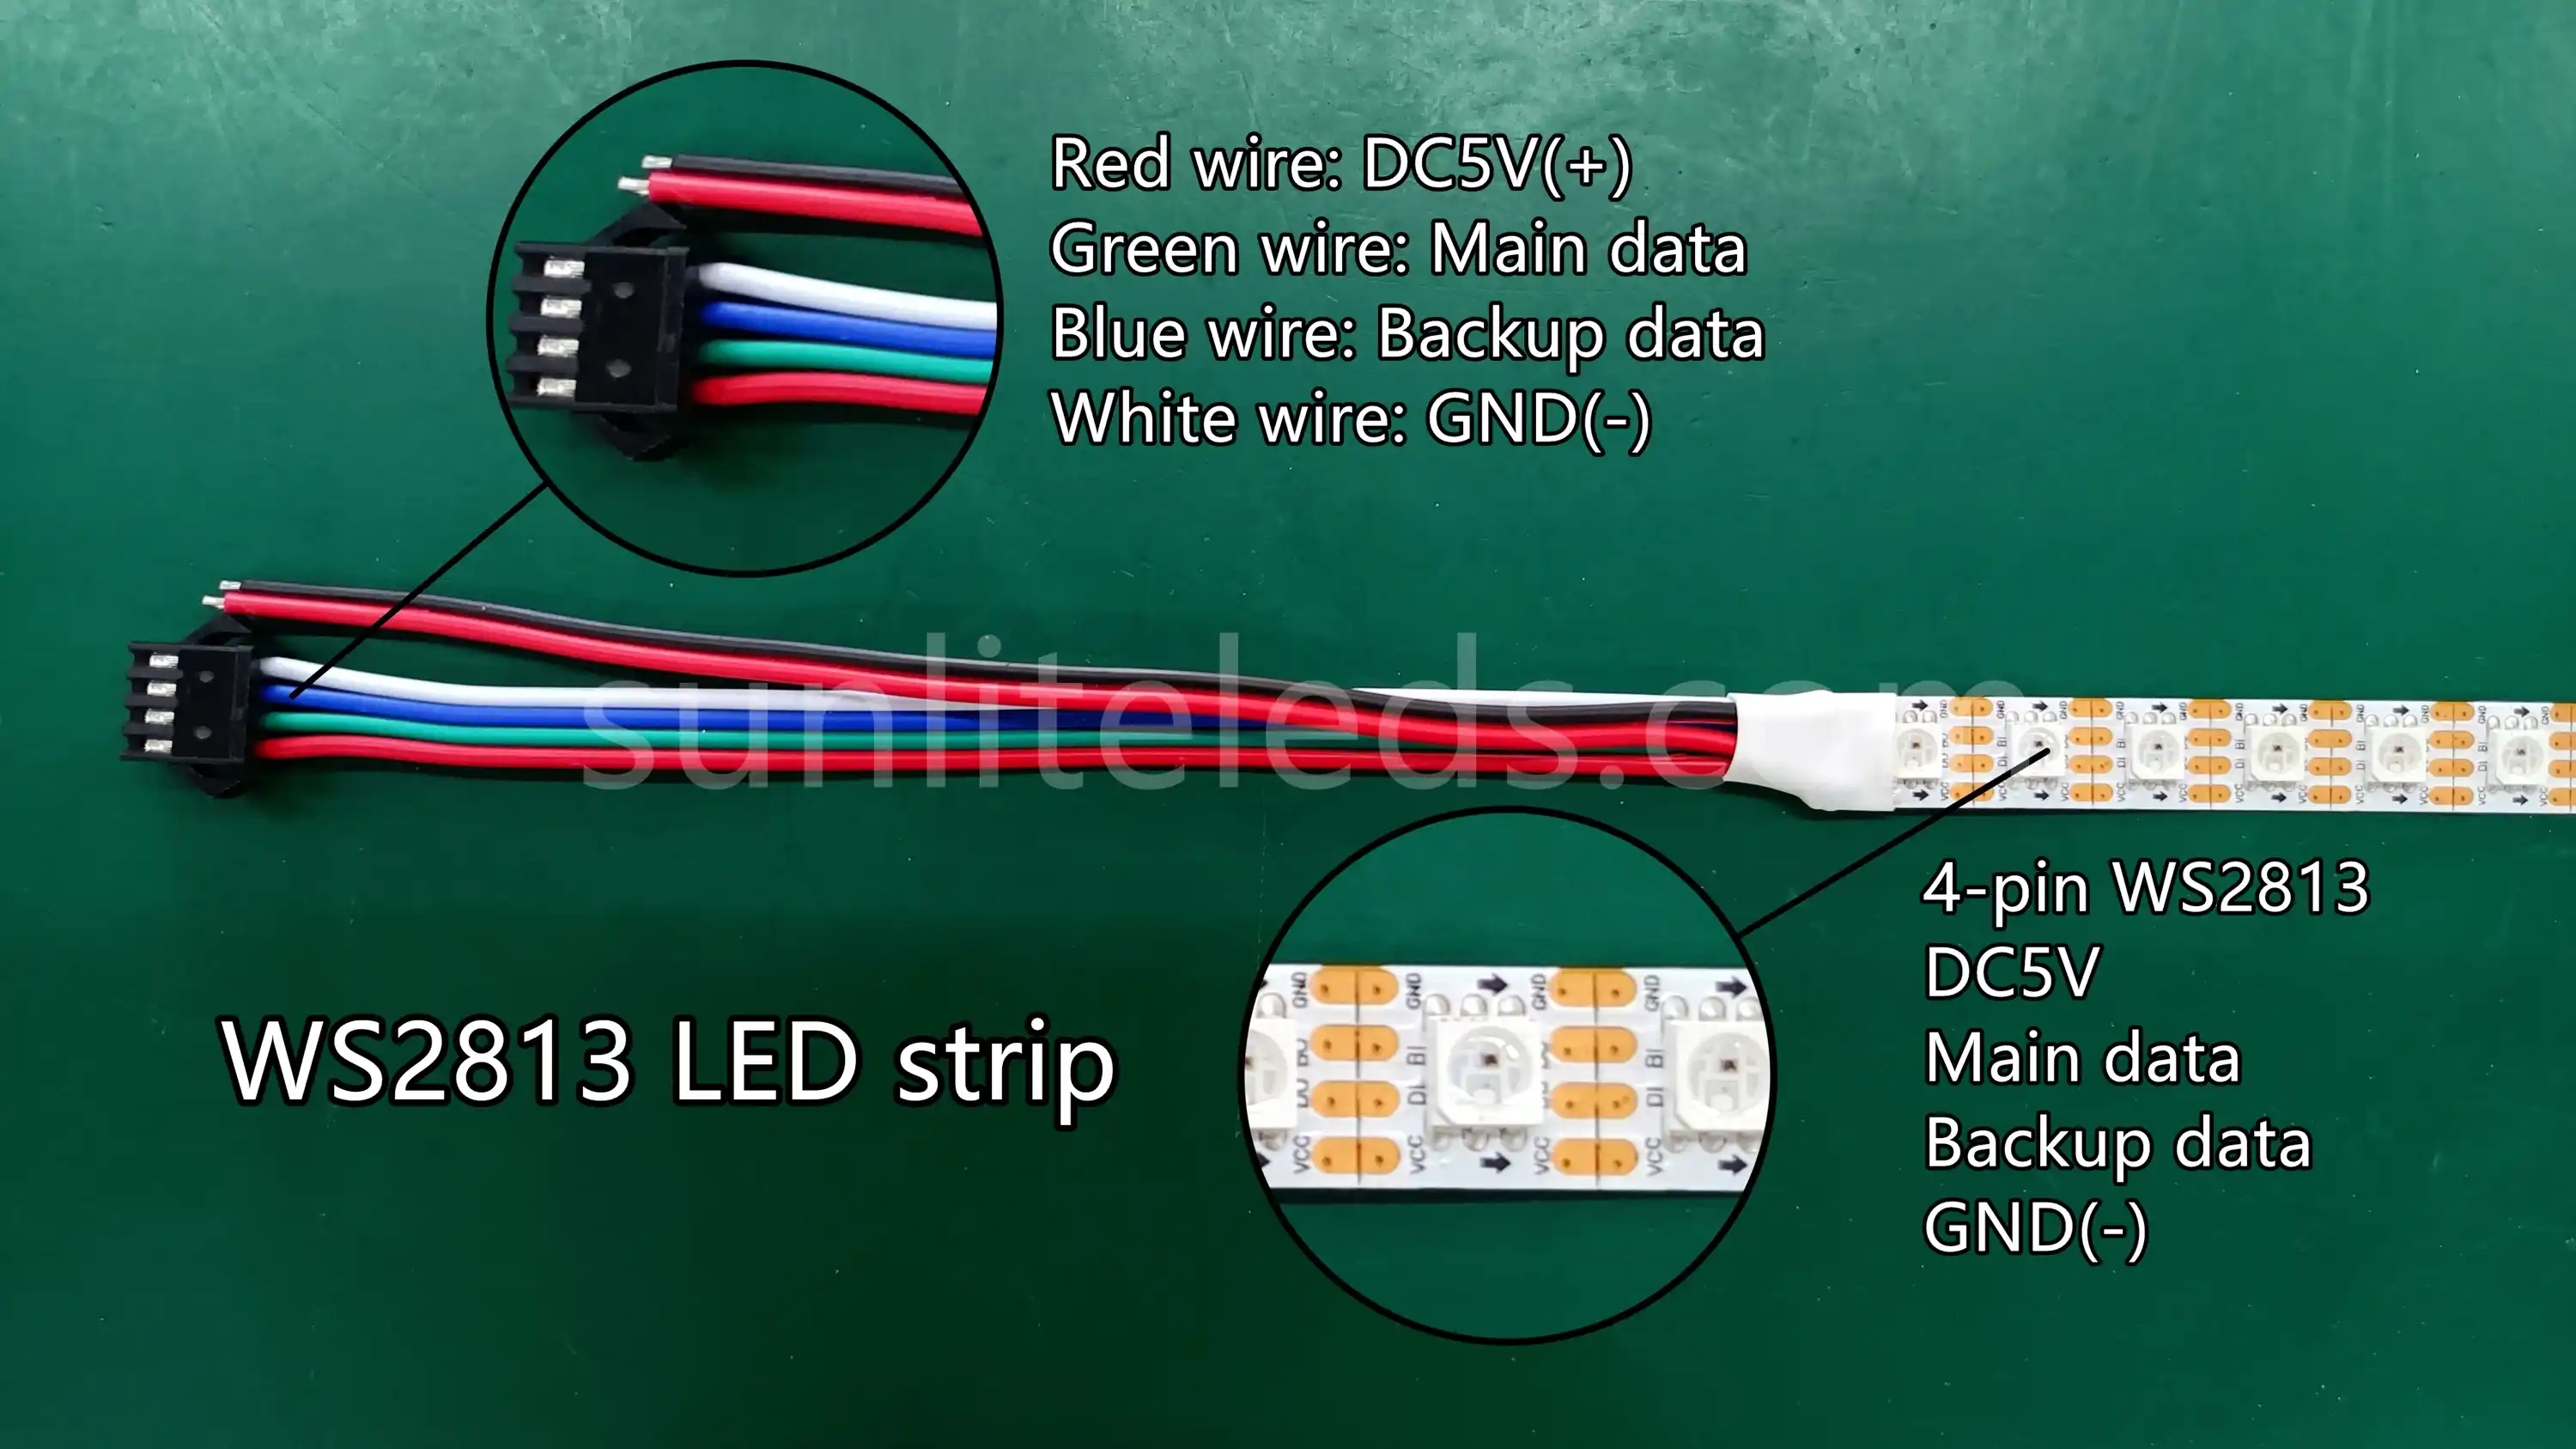
Wire
The below picture is a wiring diagram of the DC5V WS2813 RGB LED strip.
Connect
Step 1: Prepare all the devices in advance. We need a DC power supply, a LED controller, and a roll of WS2813 LED strip. Here we have prepared an adjustable voltage power supply, a K-1000C controller, and a roll of DC5V WS2813 LED strip as a connection demonstration.
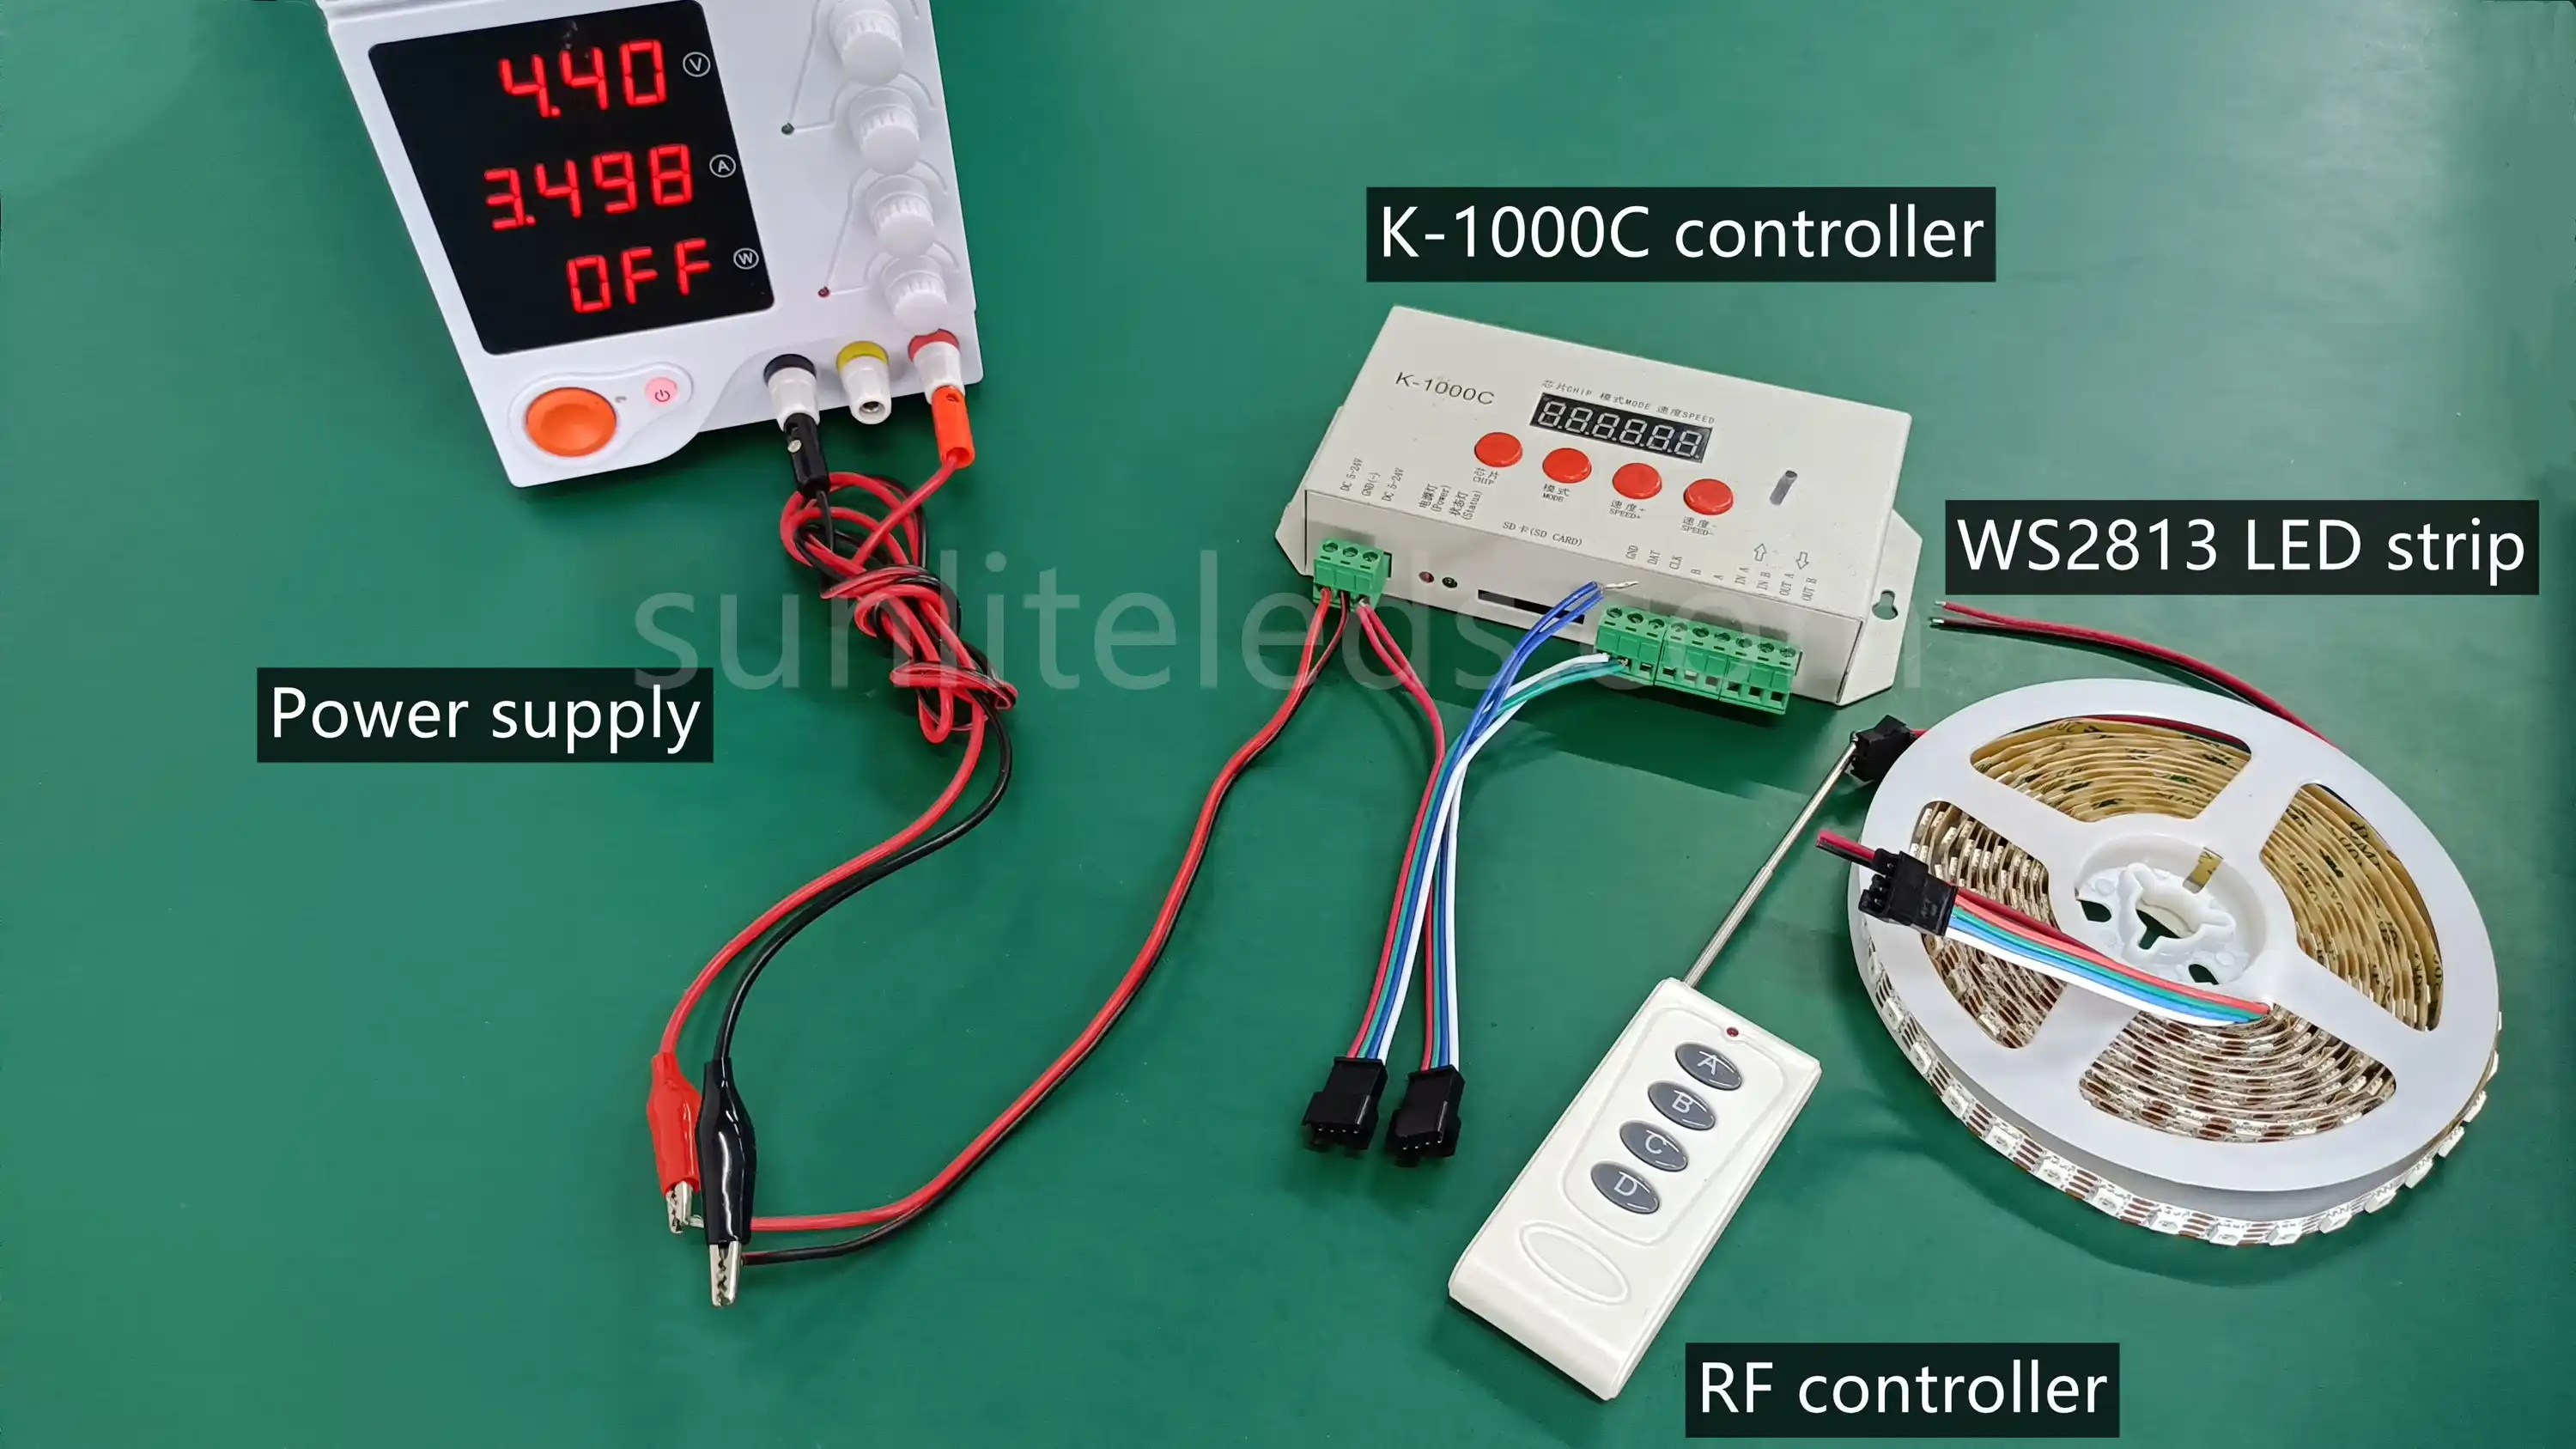
Step 2: Connect the power wire and the connector to K-1000C controller. Please notice that the blue wire is a backup data wire and no need to connect.
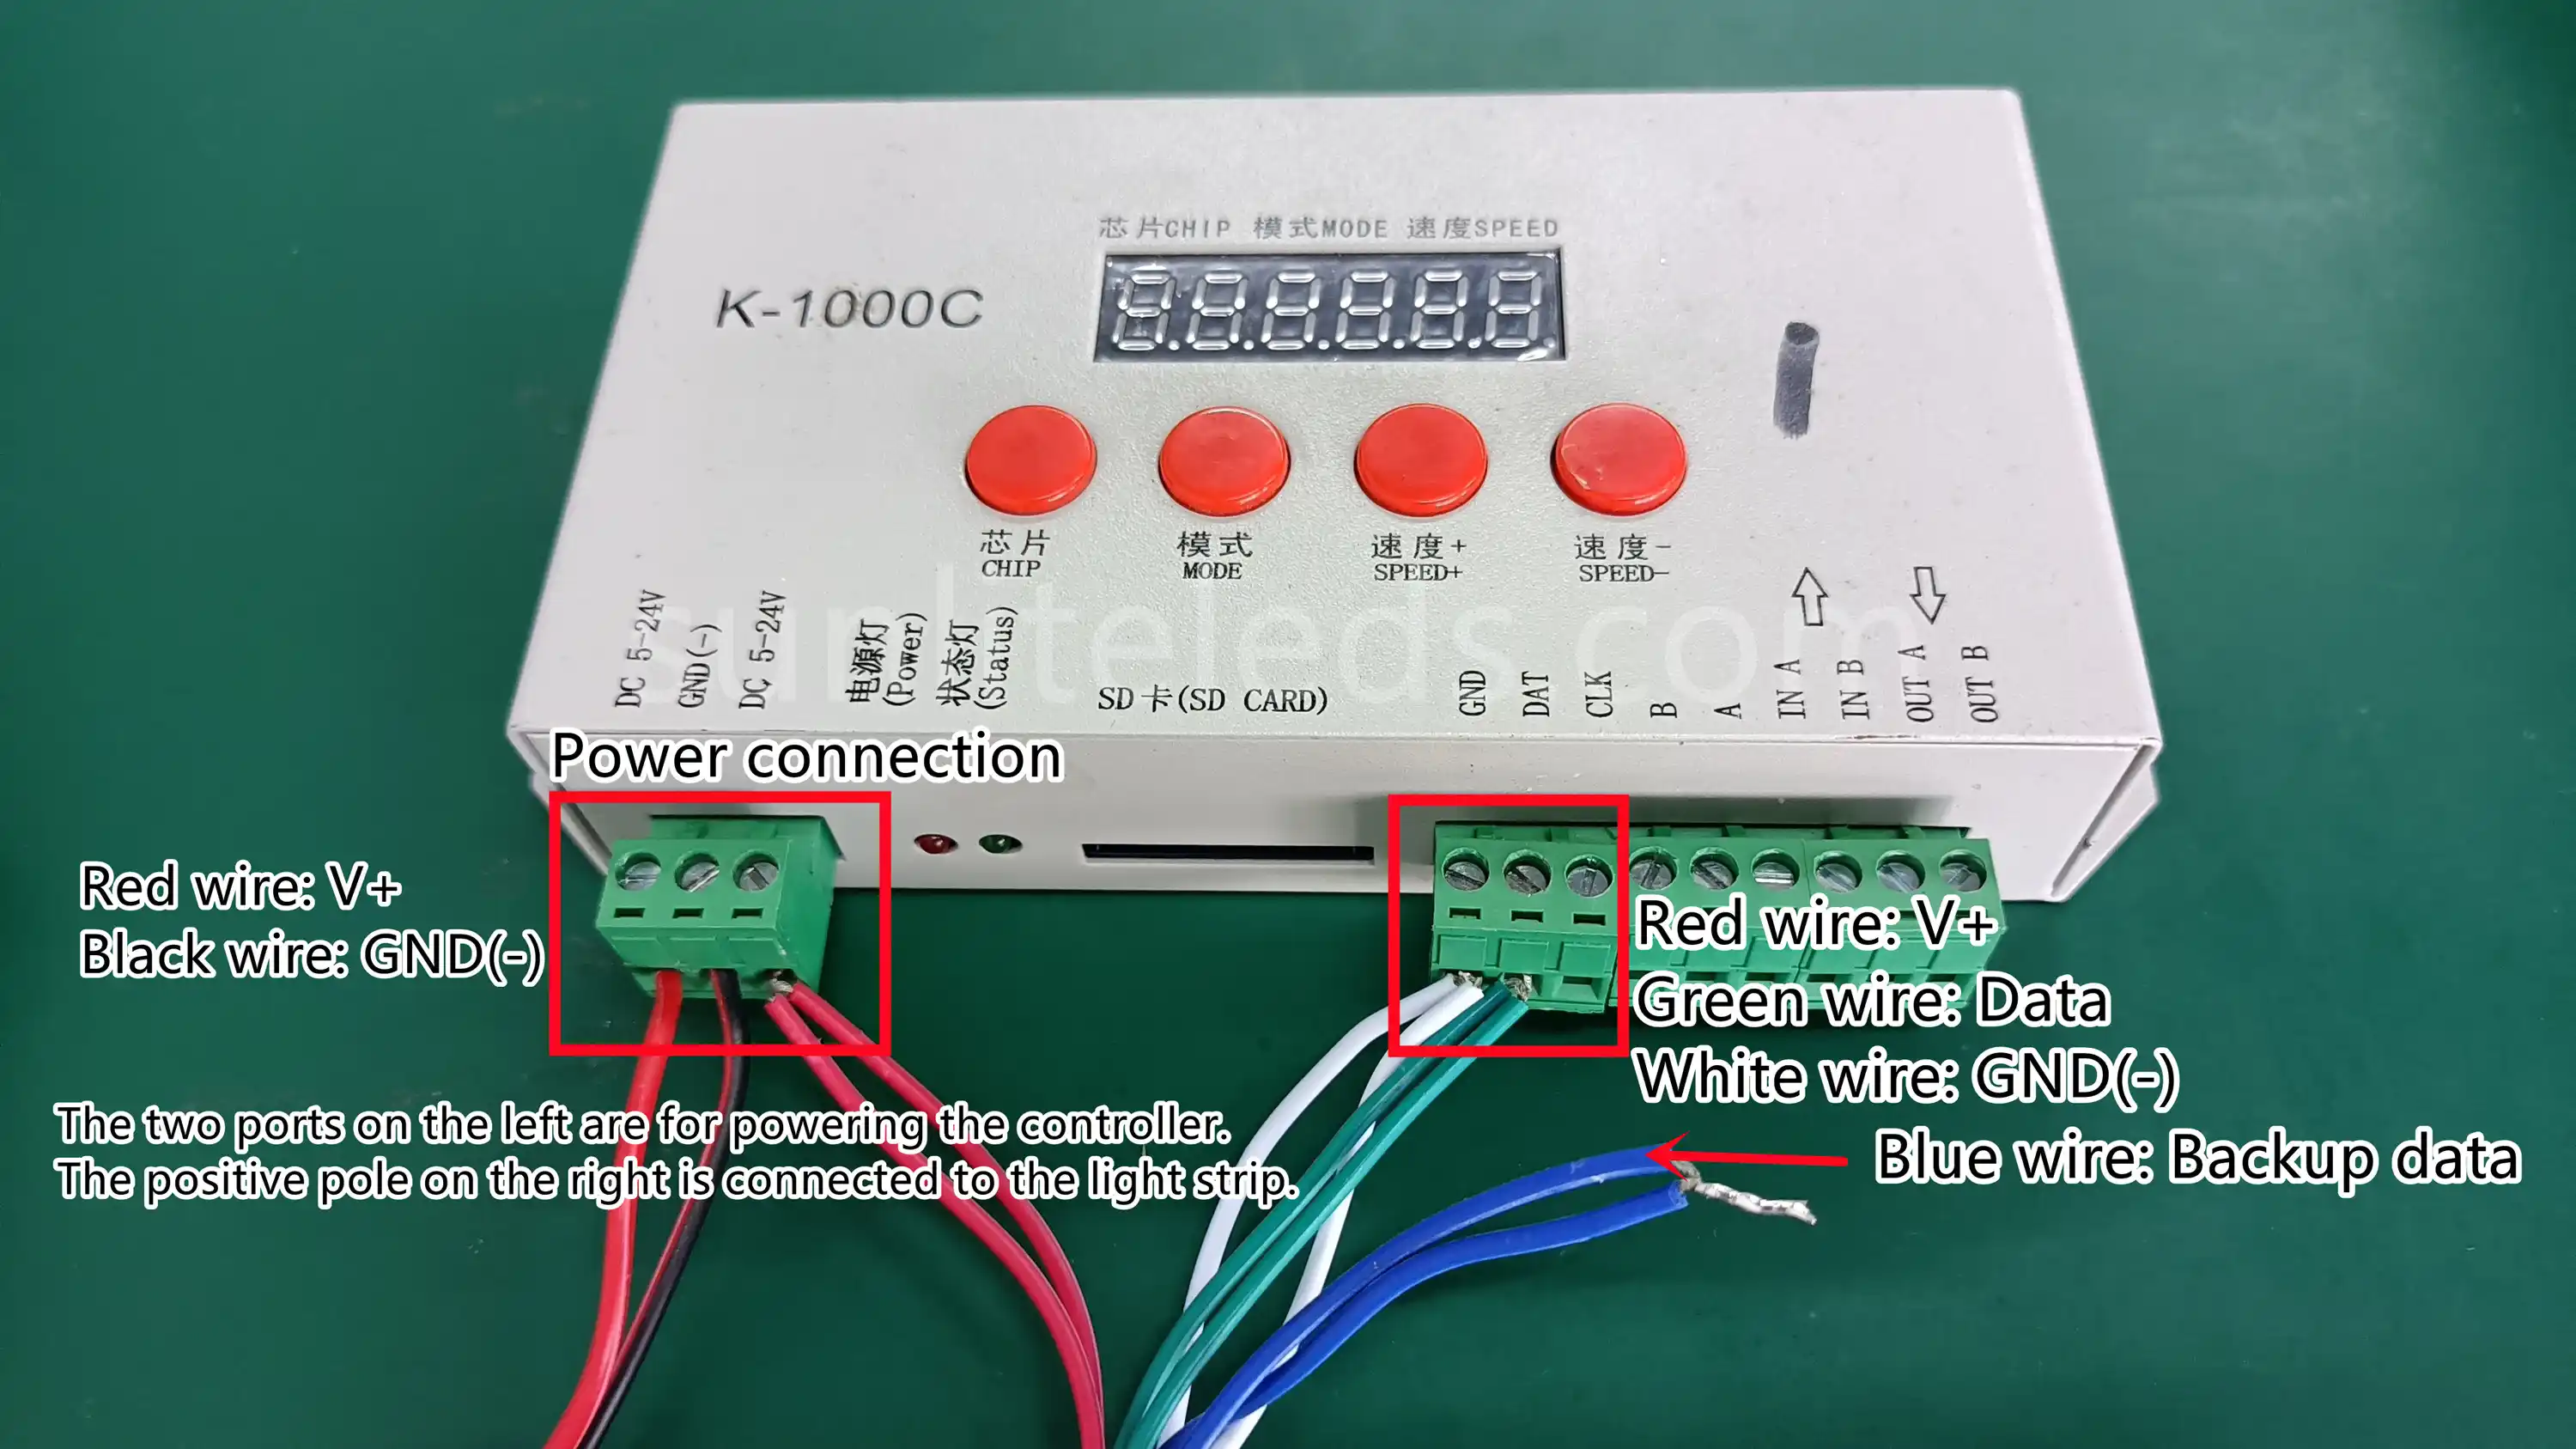
Step 3: Connect the controller to a power source. Note that the red wire is connected to the positive pole, and the black wire is connected to GND.
Step 4: Connect the WS2813 LED strip to the power source and controller. Please confirm that the connection direction is consistent with the signal transmission direction to avoid damage to the ICs and LEDs.

For now, you have finished the connection steps. Press the power switch to turn on the power, and the light strip will be lit. Next, we will see how to control this individually addressable led strip.
Control
You can directly use the buttons on the controller to adjust the effect, or you can use the matching RF controller to control it. In this demo, we only showed the program effects built into the K-1000C, and you can also customize programs. If you want to achieve a specific effect but don’t know how to program individually addressable LED strip, feel free to contact us and we will design for you.
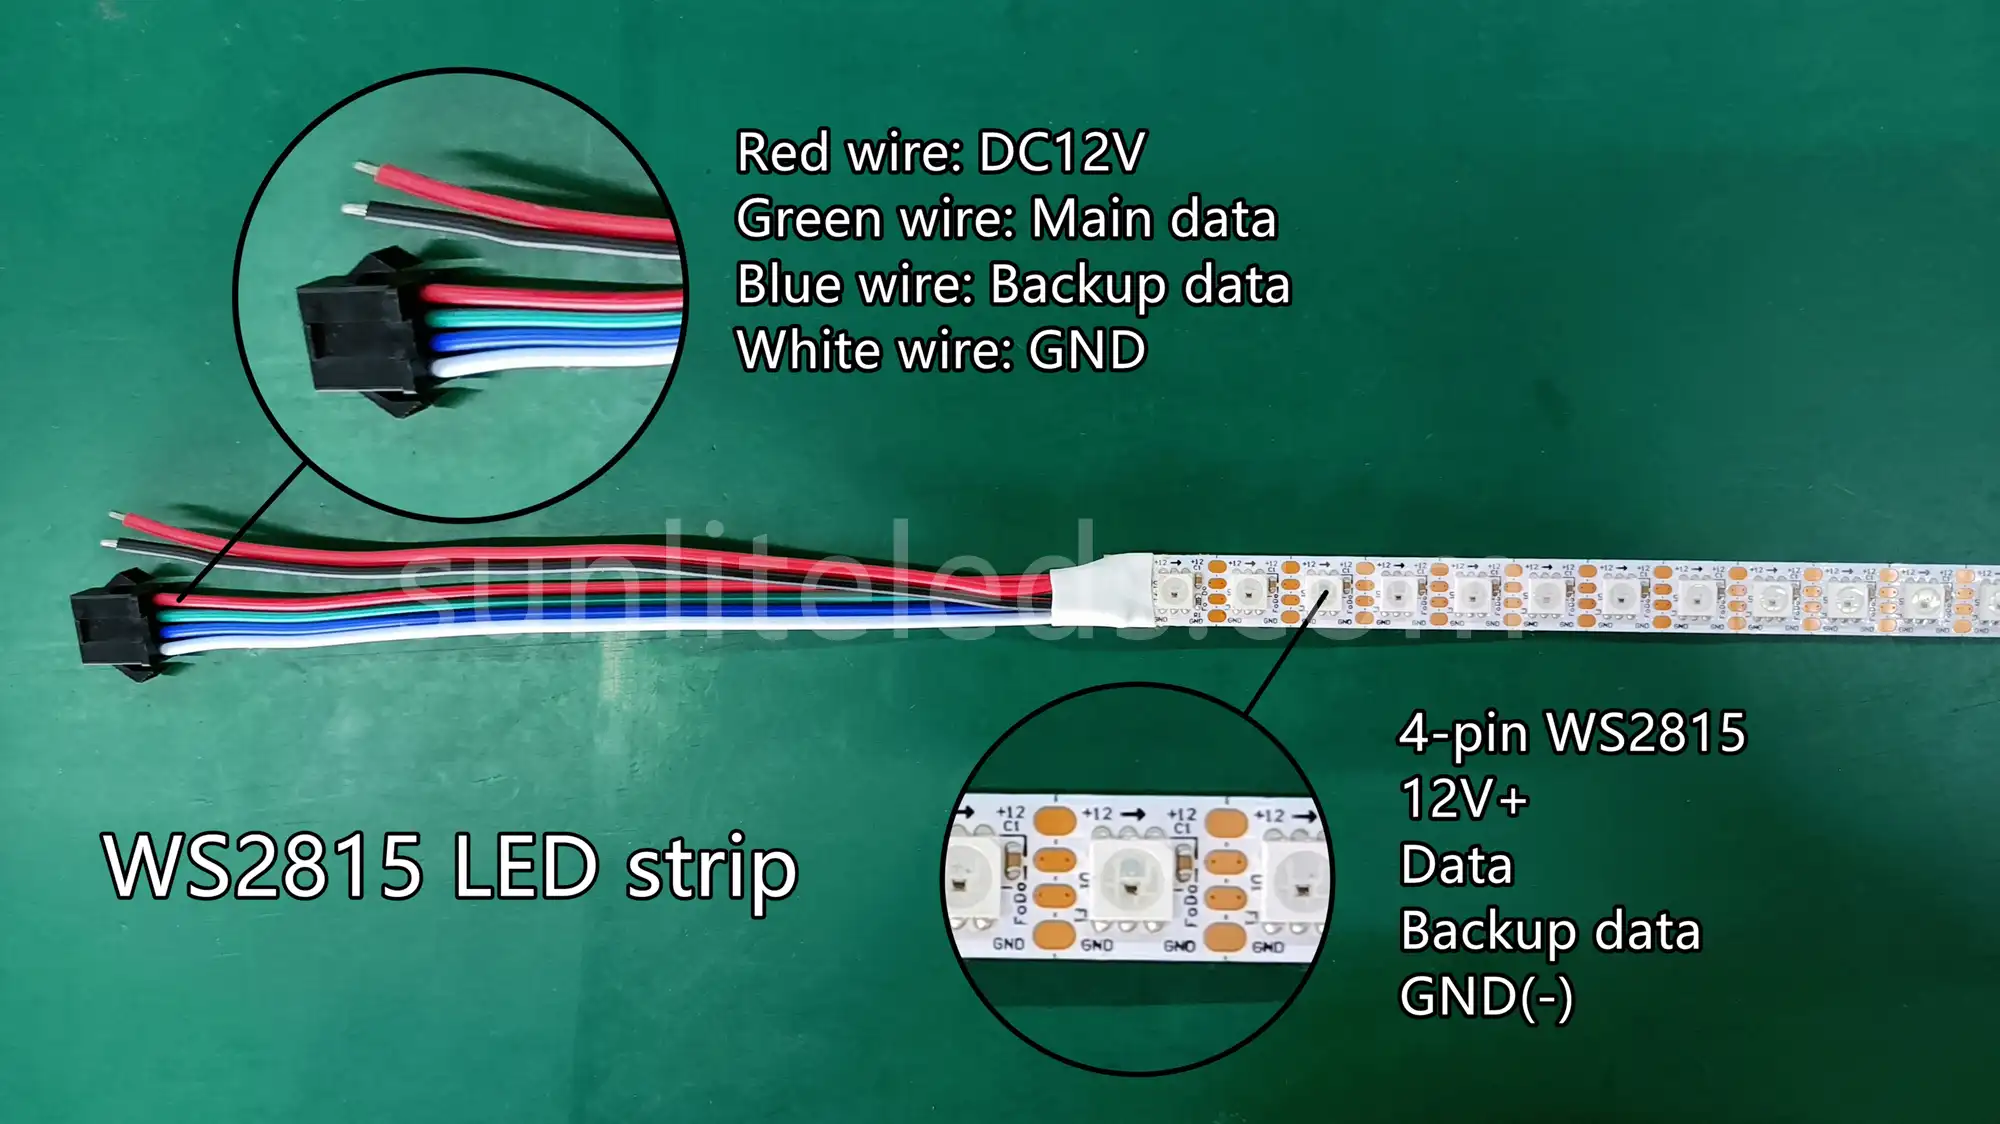
Control, connect and wire WS2815 LED strip
WS2815 LED strip is similar to WS2813, both have individual control and breakpoint-resume functions. However, the WS2815 LED strip is DC12V, which can achieve stable current and brightness over a longer distance, suitable for larger lighting projects.
It is a 4-wire addressable LED strip, 2 wires for power connection and 2 wires for data transmission, below picture shows the details of WS2815 RGB LED strip.
Wire
The below picture is a wiring diagram of the DC12V WS2815 RGB LED strip.
Connect
Step 1: Get all the connection equipment ready. As the below picture shows, we prepared a roll of WS2815 RGB LED strip, a power supply, a K-1000C controller, and the matching RF controller.
Step 2: Connect the power cord and JST connector to the controller port. Connection way as the below picture shows:
Step 3: Connect the K-1000C controller to the DC12V power source. Note that the positive and negative poles of the power supply correspond to the controller input terminals.
Step 4: Connect the WS2815 LED strip to K-1000C controller. (Before connecting to the controller, check whether the signal direction is correct to avoid a reverse signal connection.

By now, you have completed the wiring work. Press the power on button to light up the strip.
Control
In this demonstration, we showed how to control the WS2815 light strip directly with the buttons on the controller and remotely with the RF controller. Besides, you can use PC online control and program to make the strip light in a specific way.
If you have any questions about how to program addressable led strip, please contact us and we will provide software to you and help you to learn more.
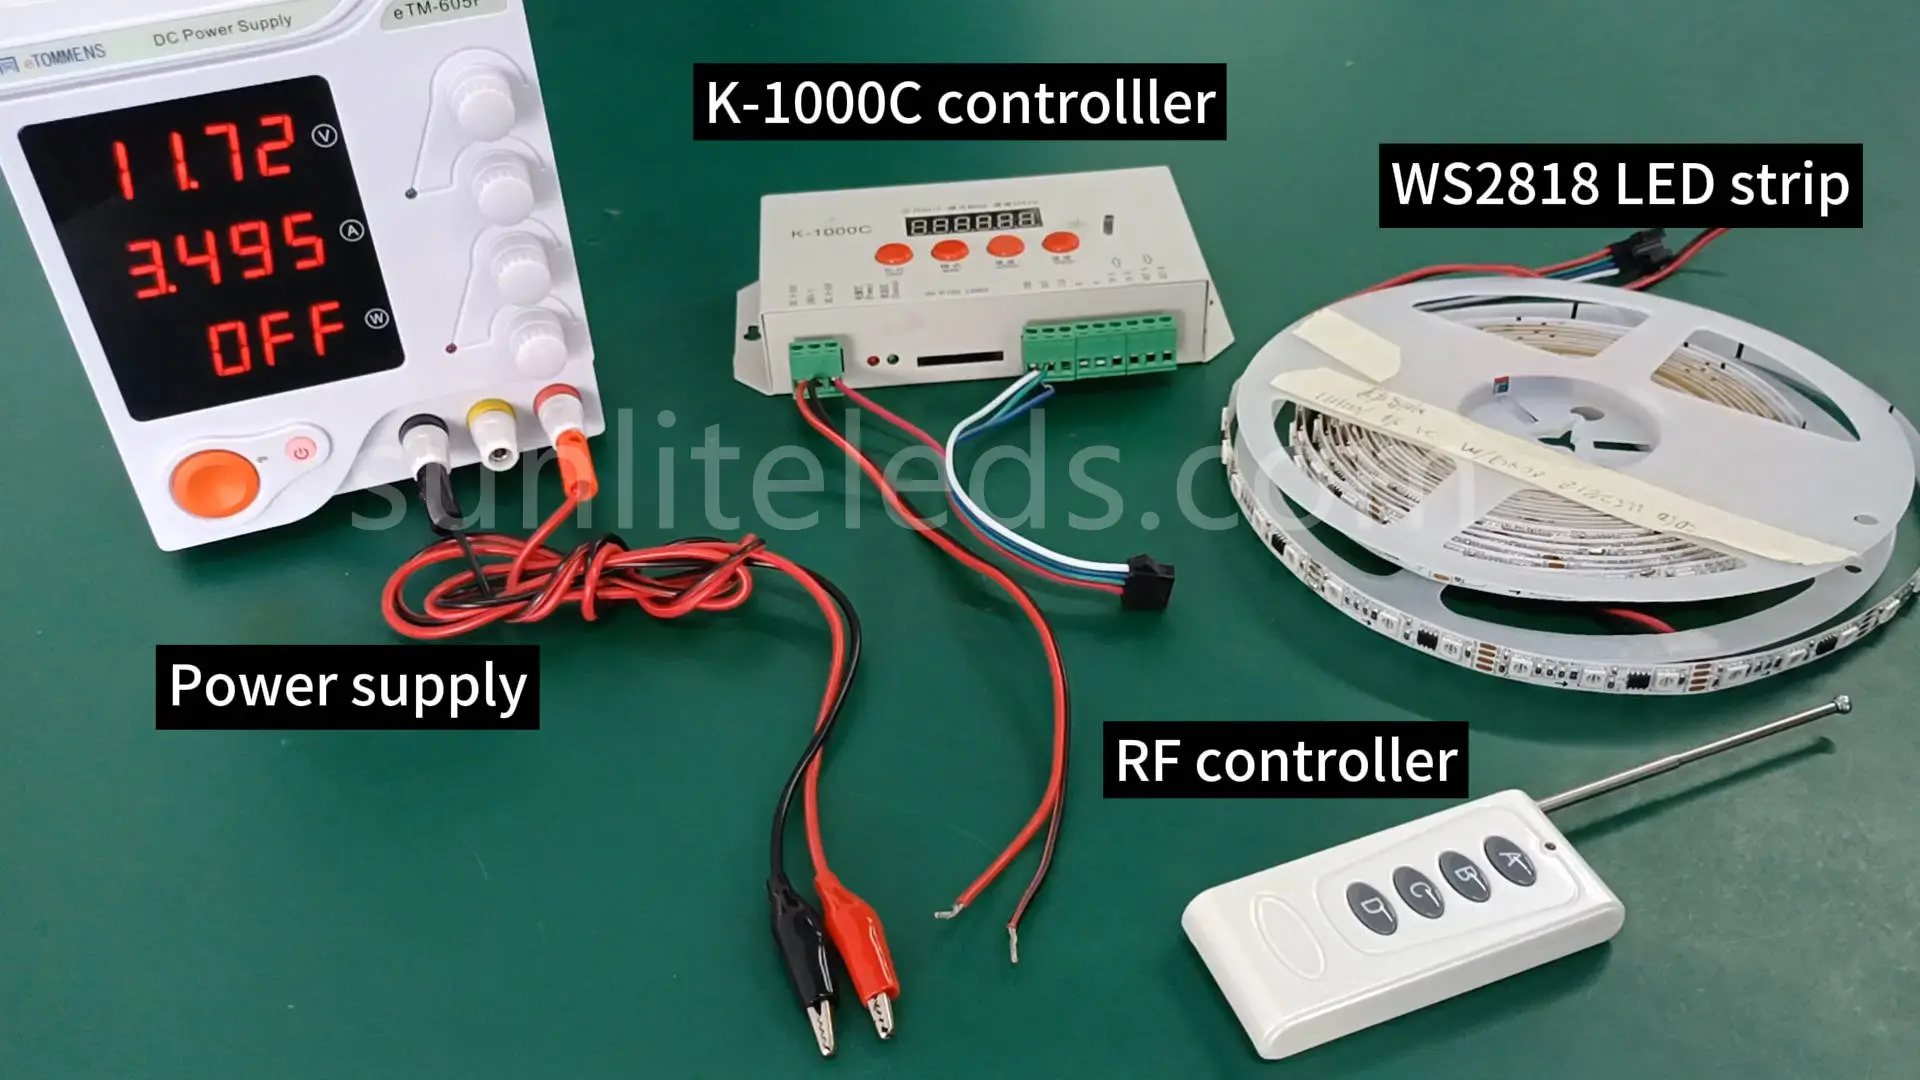
Control, connect and wire WS2818 LED strip
WS2818 LED strip is a new addressable RGB LED strip with external ICs, which has a good performance in signal transmission. Due to its dual signal transmission, the WS2818 strip can still work normally if one LED on the strip is damaged or broken.
WS2818 LED strip also has 4 wires like WS2815, and the below figure shows the details.

Wire
This is a wiring diagram of the DC12V WS2818 RGB LED strip when using the K-1000C offline controller.

Connect
First step: Prepare power supply, LED controller, and WS2818 LED strip. We use an adjustable voltage power supply, an offline controller K-1000C, and a roll of DC12V WS2818 RGB LED strip.
Second step: Connect the red and black power cables and 4-pin terminal to the controller, the connection method is as shown in the figure below.
Third step: Connect the power cord to the output port of the DC12V power supply.
Fourth step: Connect the strip light to the controller through easily joint terminals of the controller and LED strip.

Control
To control the WS2818 LED light bar, you can directly press the buttons on the controller or use a matching RF controller to select the chip mode, program, and running speed of the effect. This demonstration video only shows one control method, and there are many other control methods, such as mobile phone APP control, PC online control, Arduino control, etc.
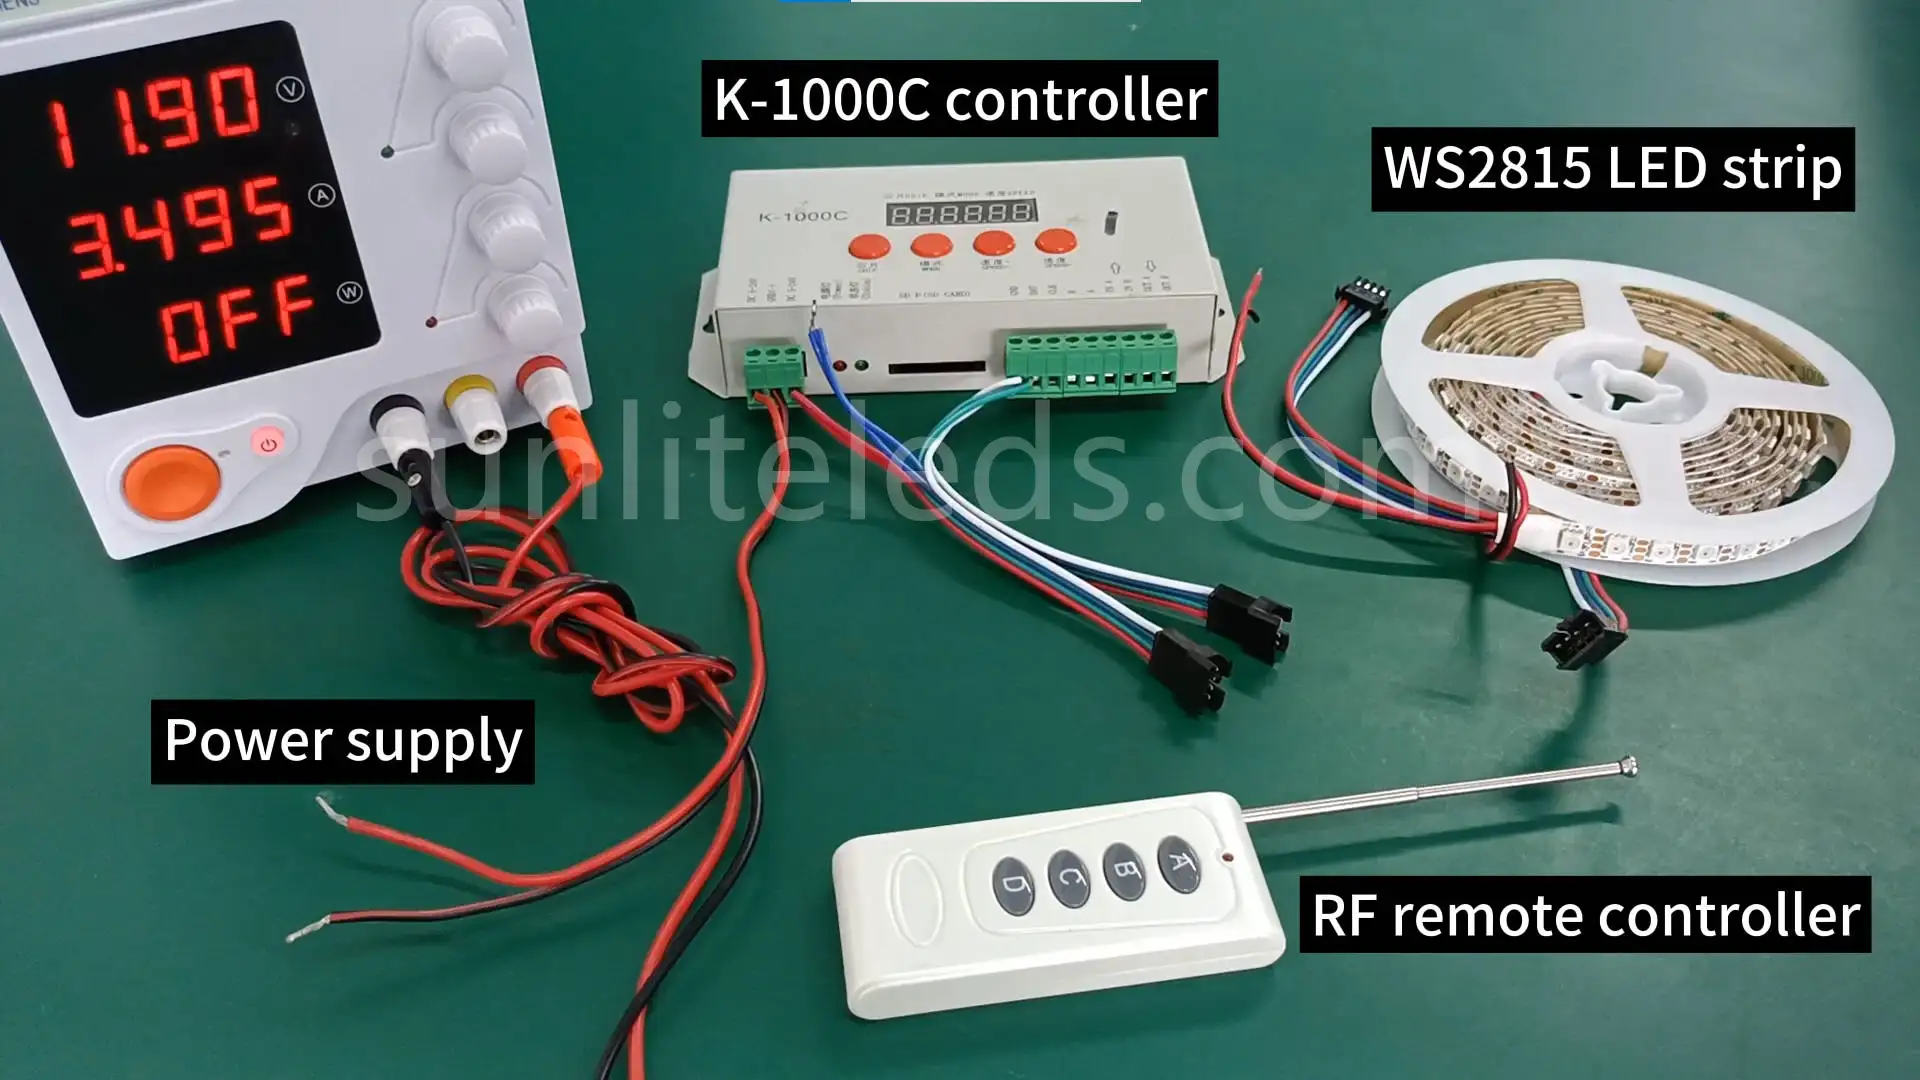
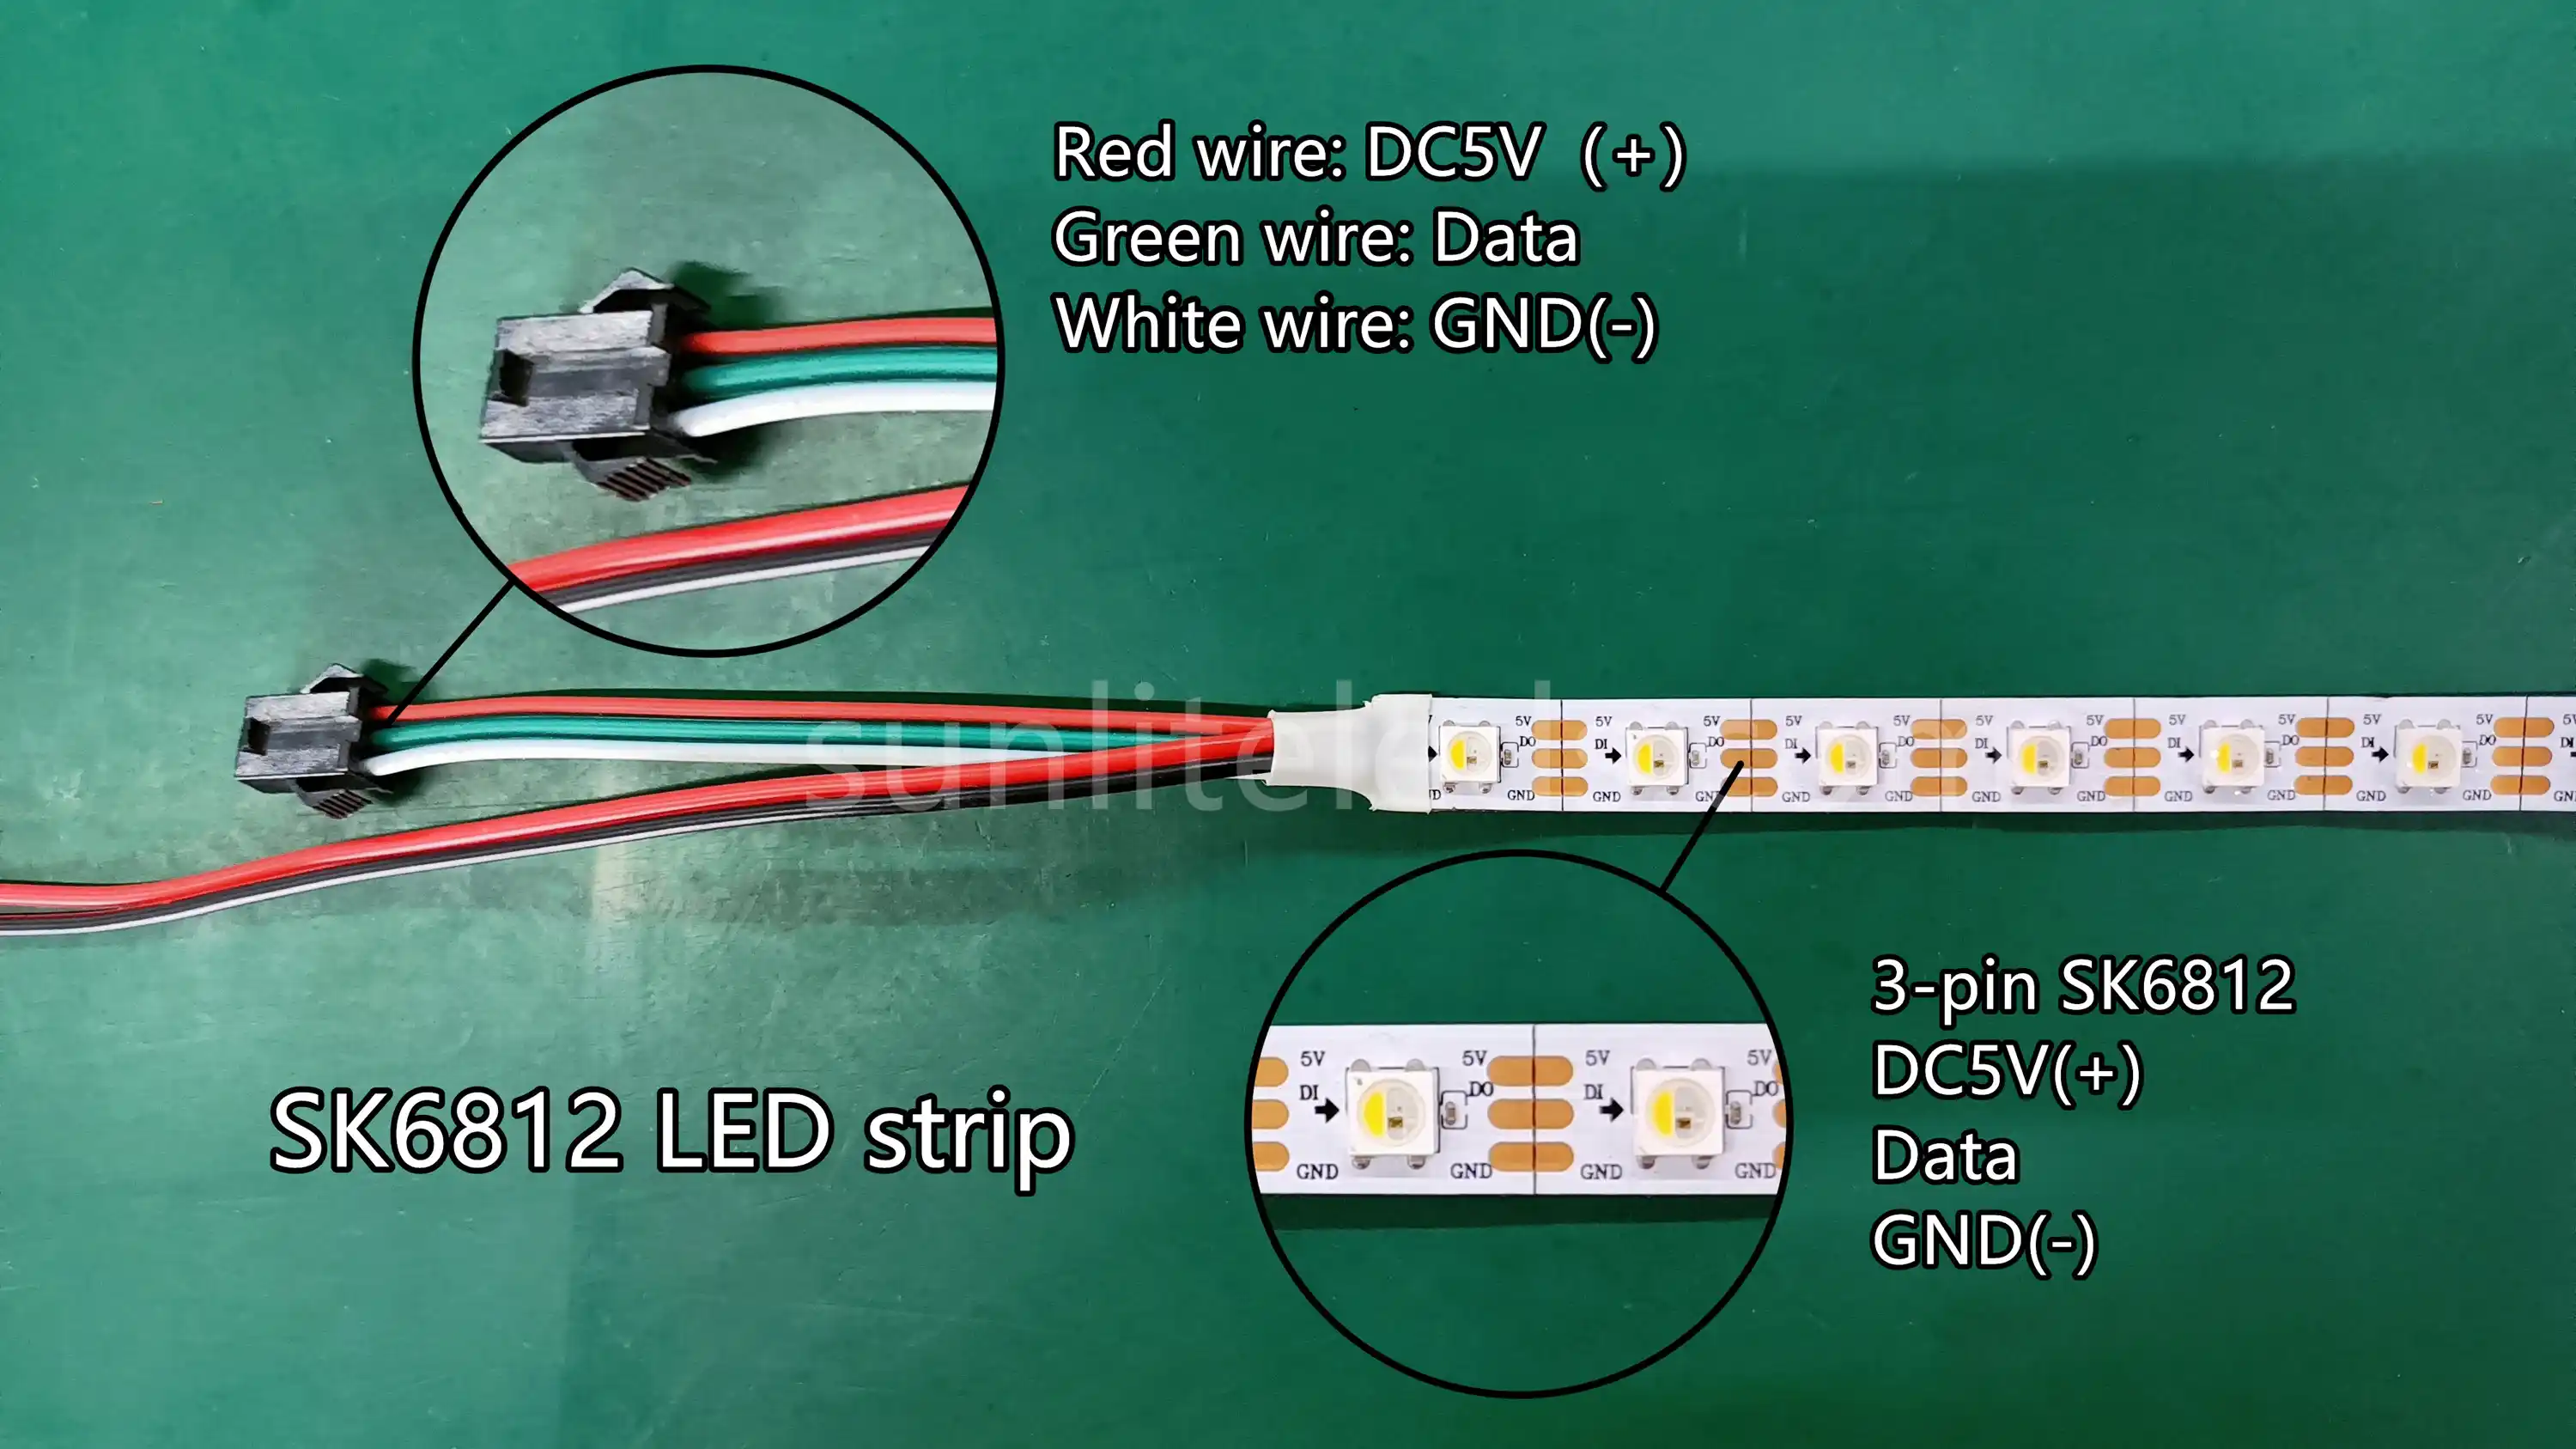
Control, connect and wire SK6812 LED strip
SK6812 LED strip is in DC5V and with built-in ICs, and the RGBW color provides more colors and effects blending. The built-in IC design enables the strips to achieve finer color and brightness adjustment, and have higher flexibility and customizability.
You can check the details of the SK6812 light strip through the below picture:
Wire
This is the wiring diagram of SK6812 RGBW LED strip connected to K-1000C controller.
Connect
Step 1: Prepare the power supply, controller and a roll of SK6812 light strip. As shown in the picture below, we have prepared an adjustable voltage power supply, a K-1000C controller, and a roll of 5V SK6812 RGBW LED strip.
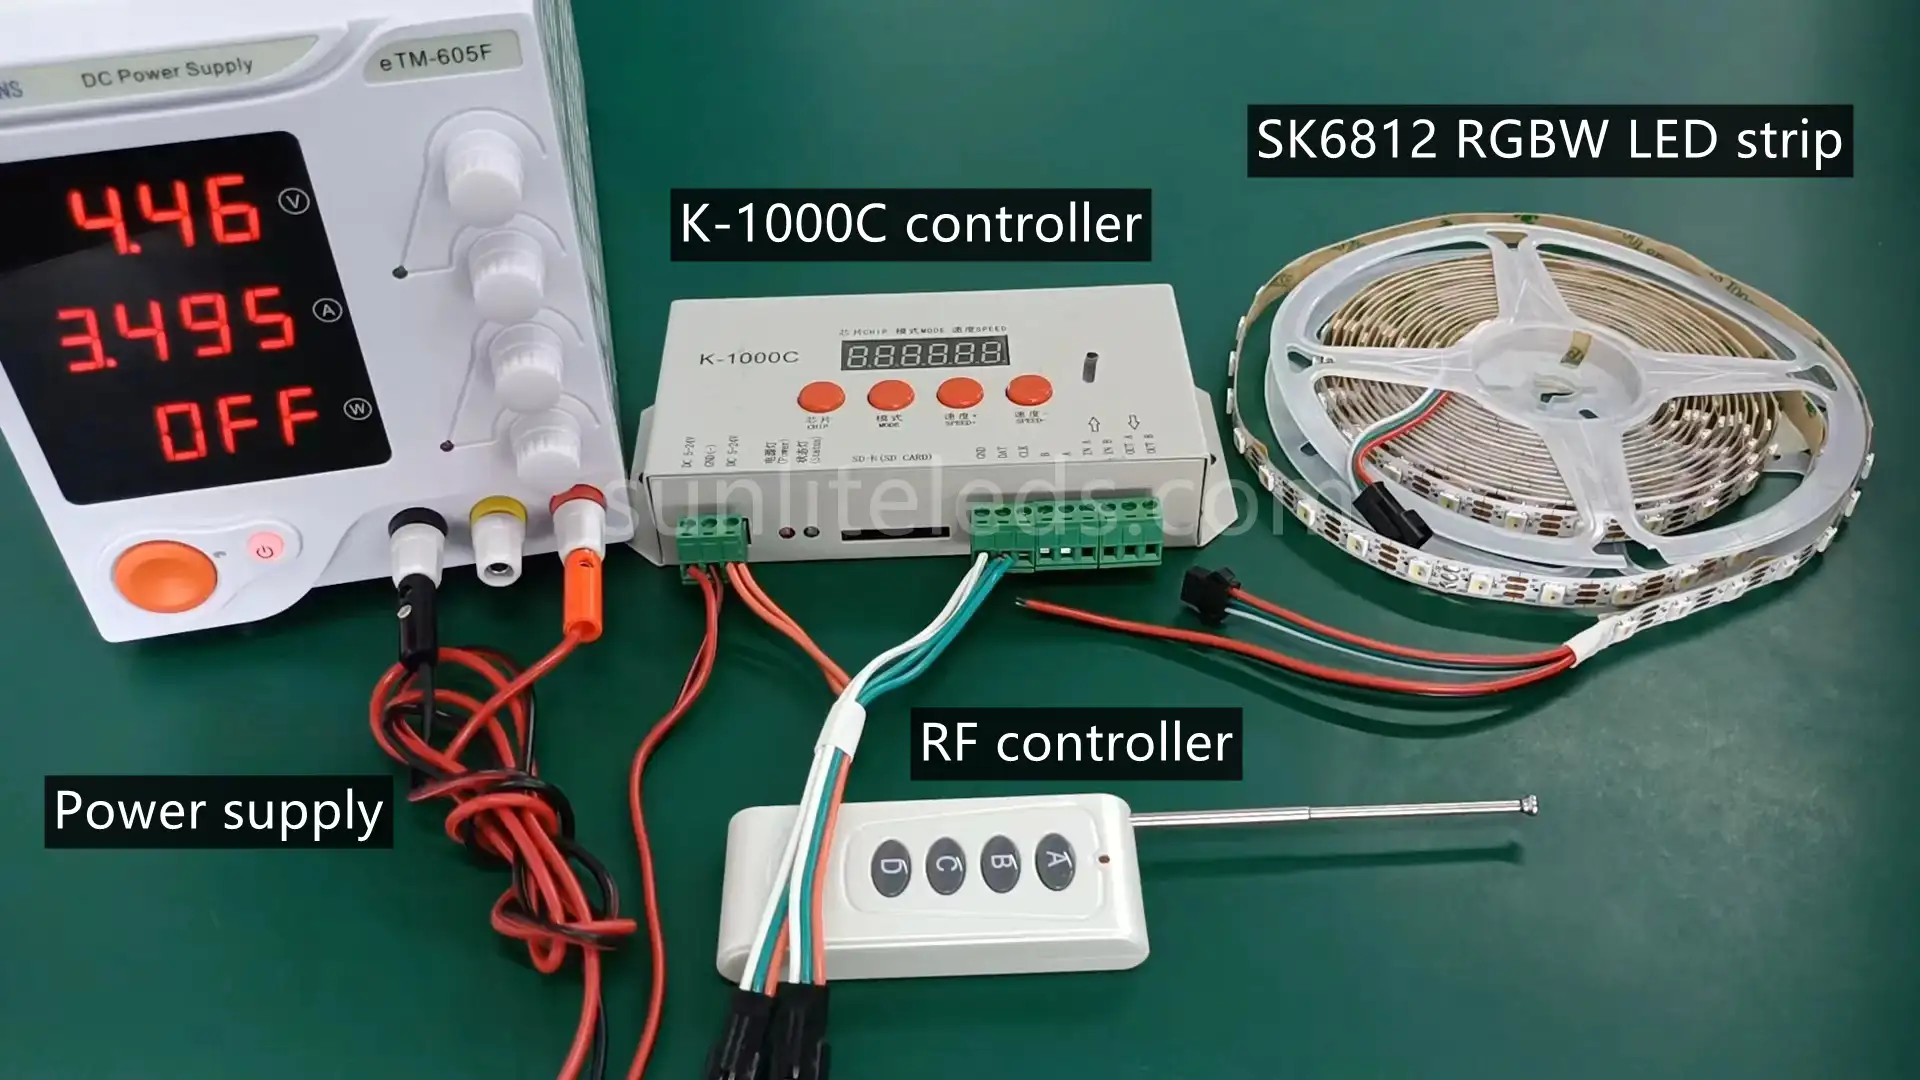
Step 2: Connect the power cord and JST connector to the controller. You can refer to the below picture to finish the wire connection.
Step 3: Connect the power cord to the power supply. Generally, the red wire connects to positive pole, and black wire connects to negative pole.
Step 4: Connect the SK6812 LED strip with K-1000C. Before connecting, please check the signal direction as shown in the figure below to avoid reverse signal connection.

Now, you have completed the connection part. Check that the voltage of the power supply is correct, and then turn on the power.
Control
As you can see from the demo video, we can control the light strip directly with the controller, or with the matching RF remote control. For large lighting projects, you can use the master controller and slave controller to achieve the entire control. And for small lighting scenarios, you can use the mini smart controller and APP control.
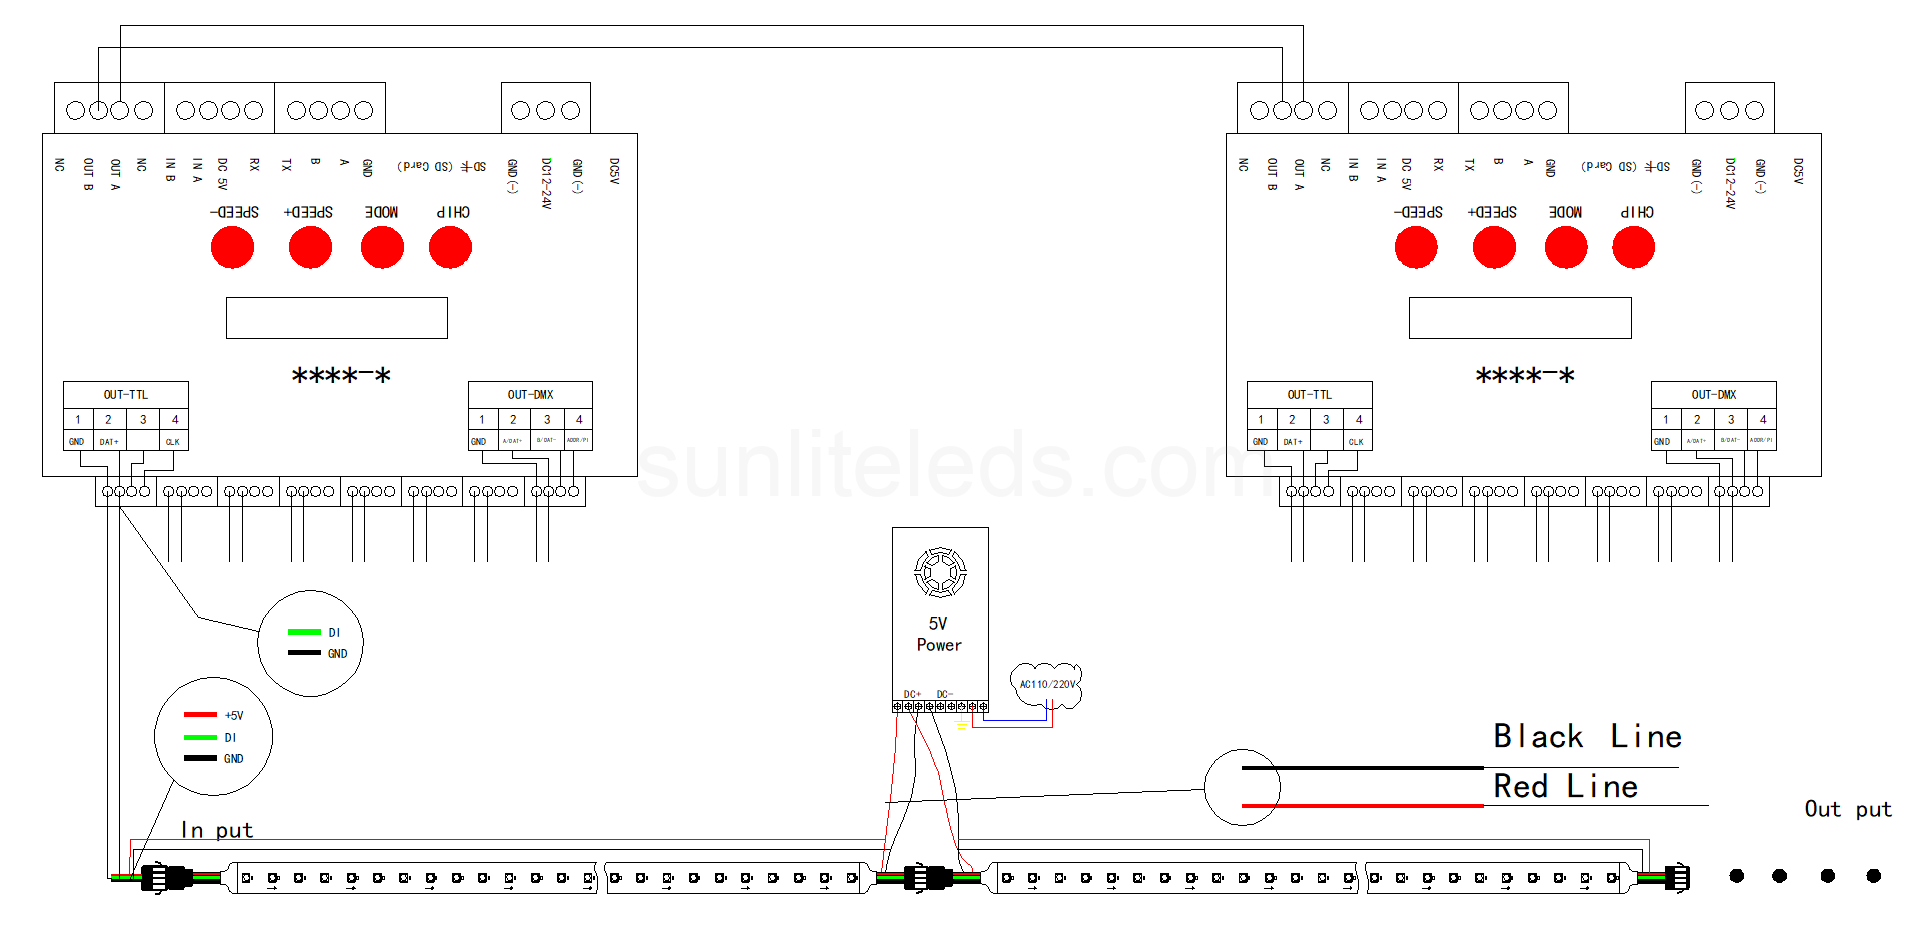
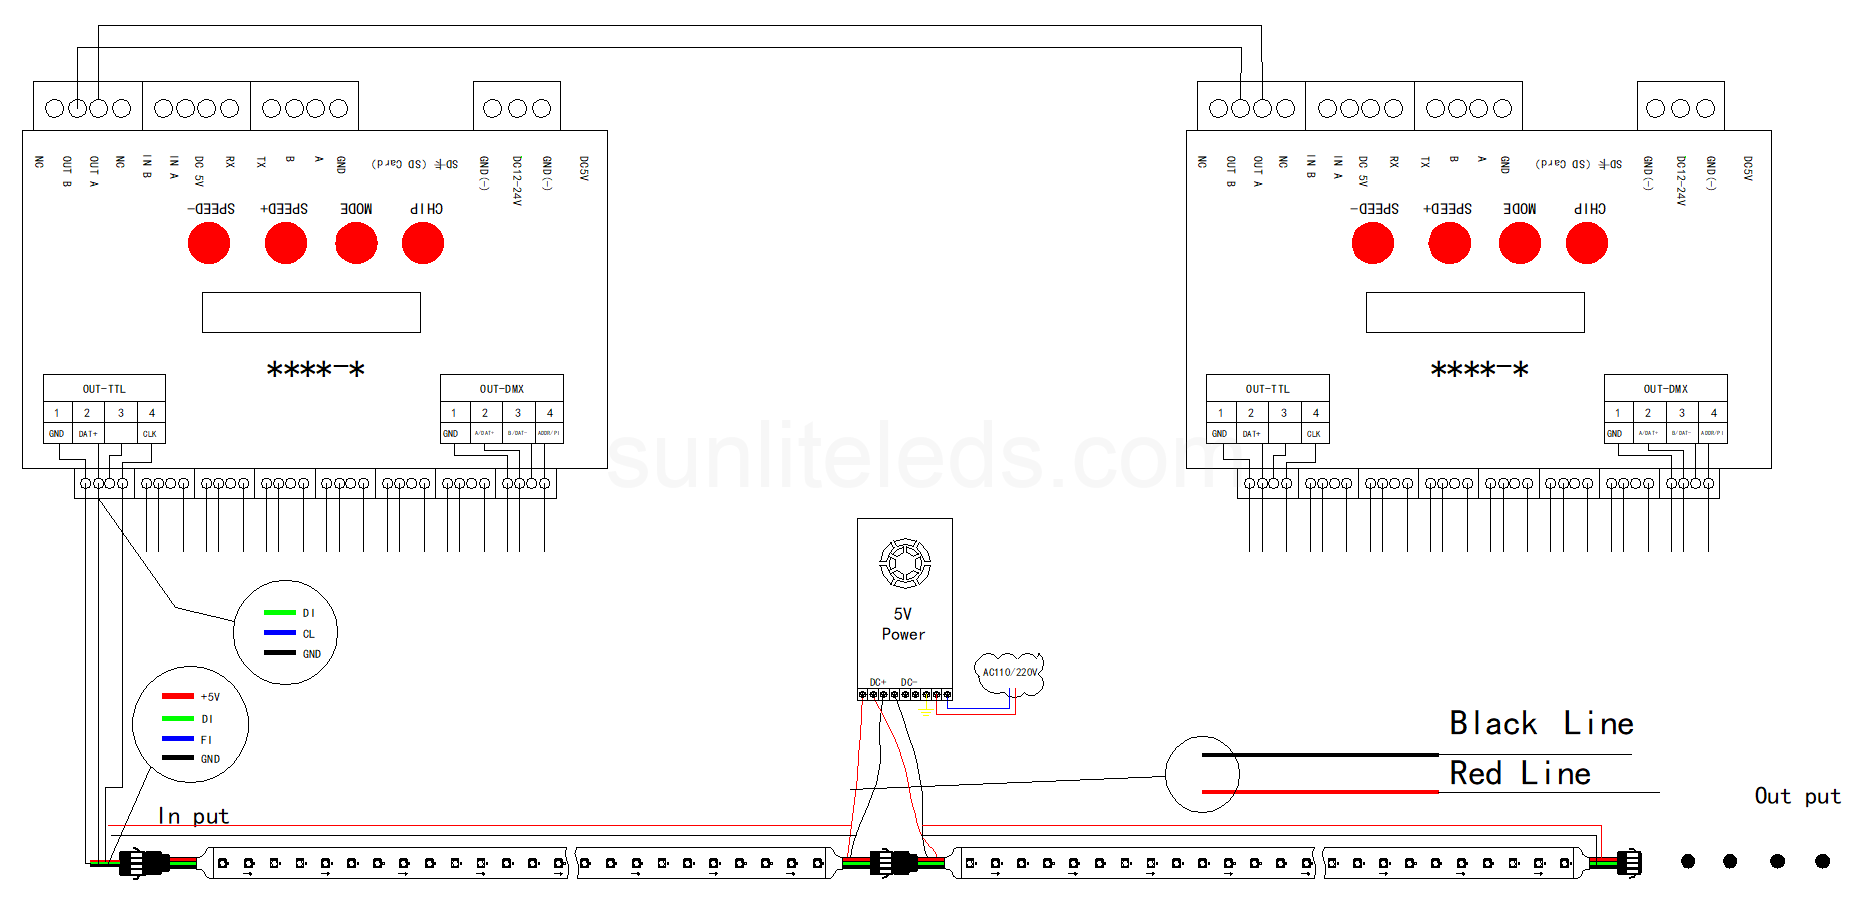
Control, connect and wire DMX LED strip
DMX light strips are different from the above programmable light strips with SPI signal protocol. The DMX LED strip need to set the address before control, because DMX signals are sent in a sequential manner, with each channel of the DMX controller corresponding to a specific light fixture or group of fixtures. About how to set addresses for DMX LED strips, please check this video: DMX Address Setting Guide
DMX LED strips use external ICs for a more stable performance. With dual signal transmission, the DMX512 LED strips have better fault tolerance that usually called breakpoint resume function.
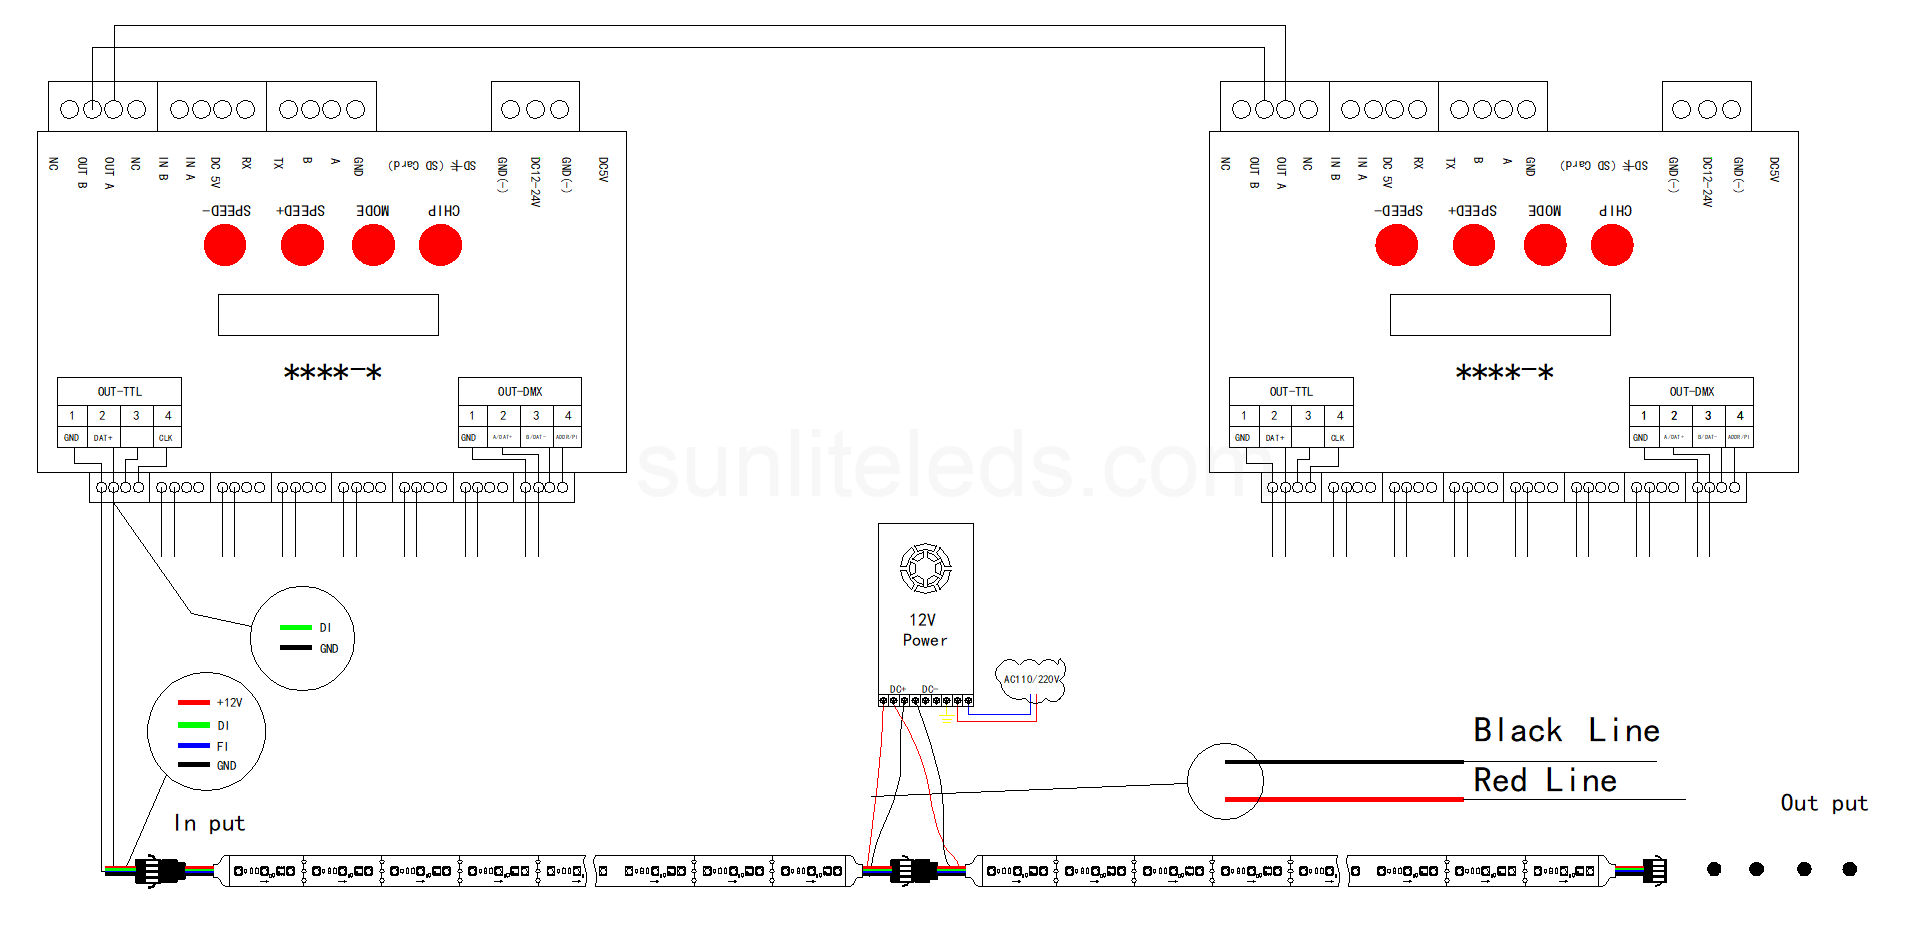
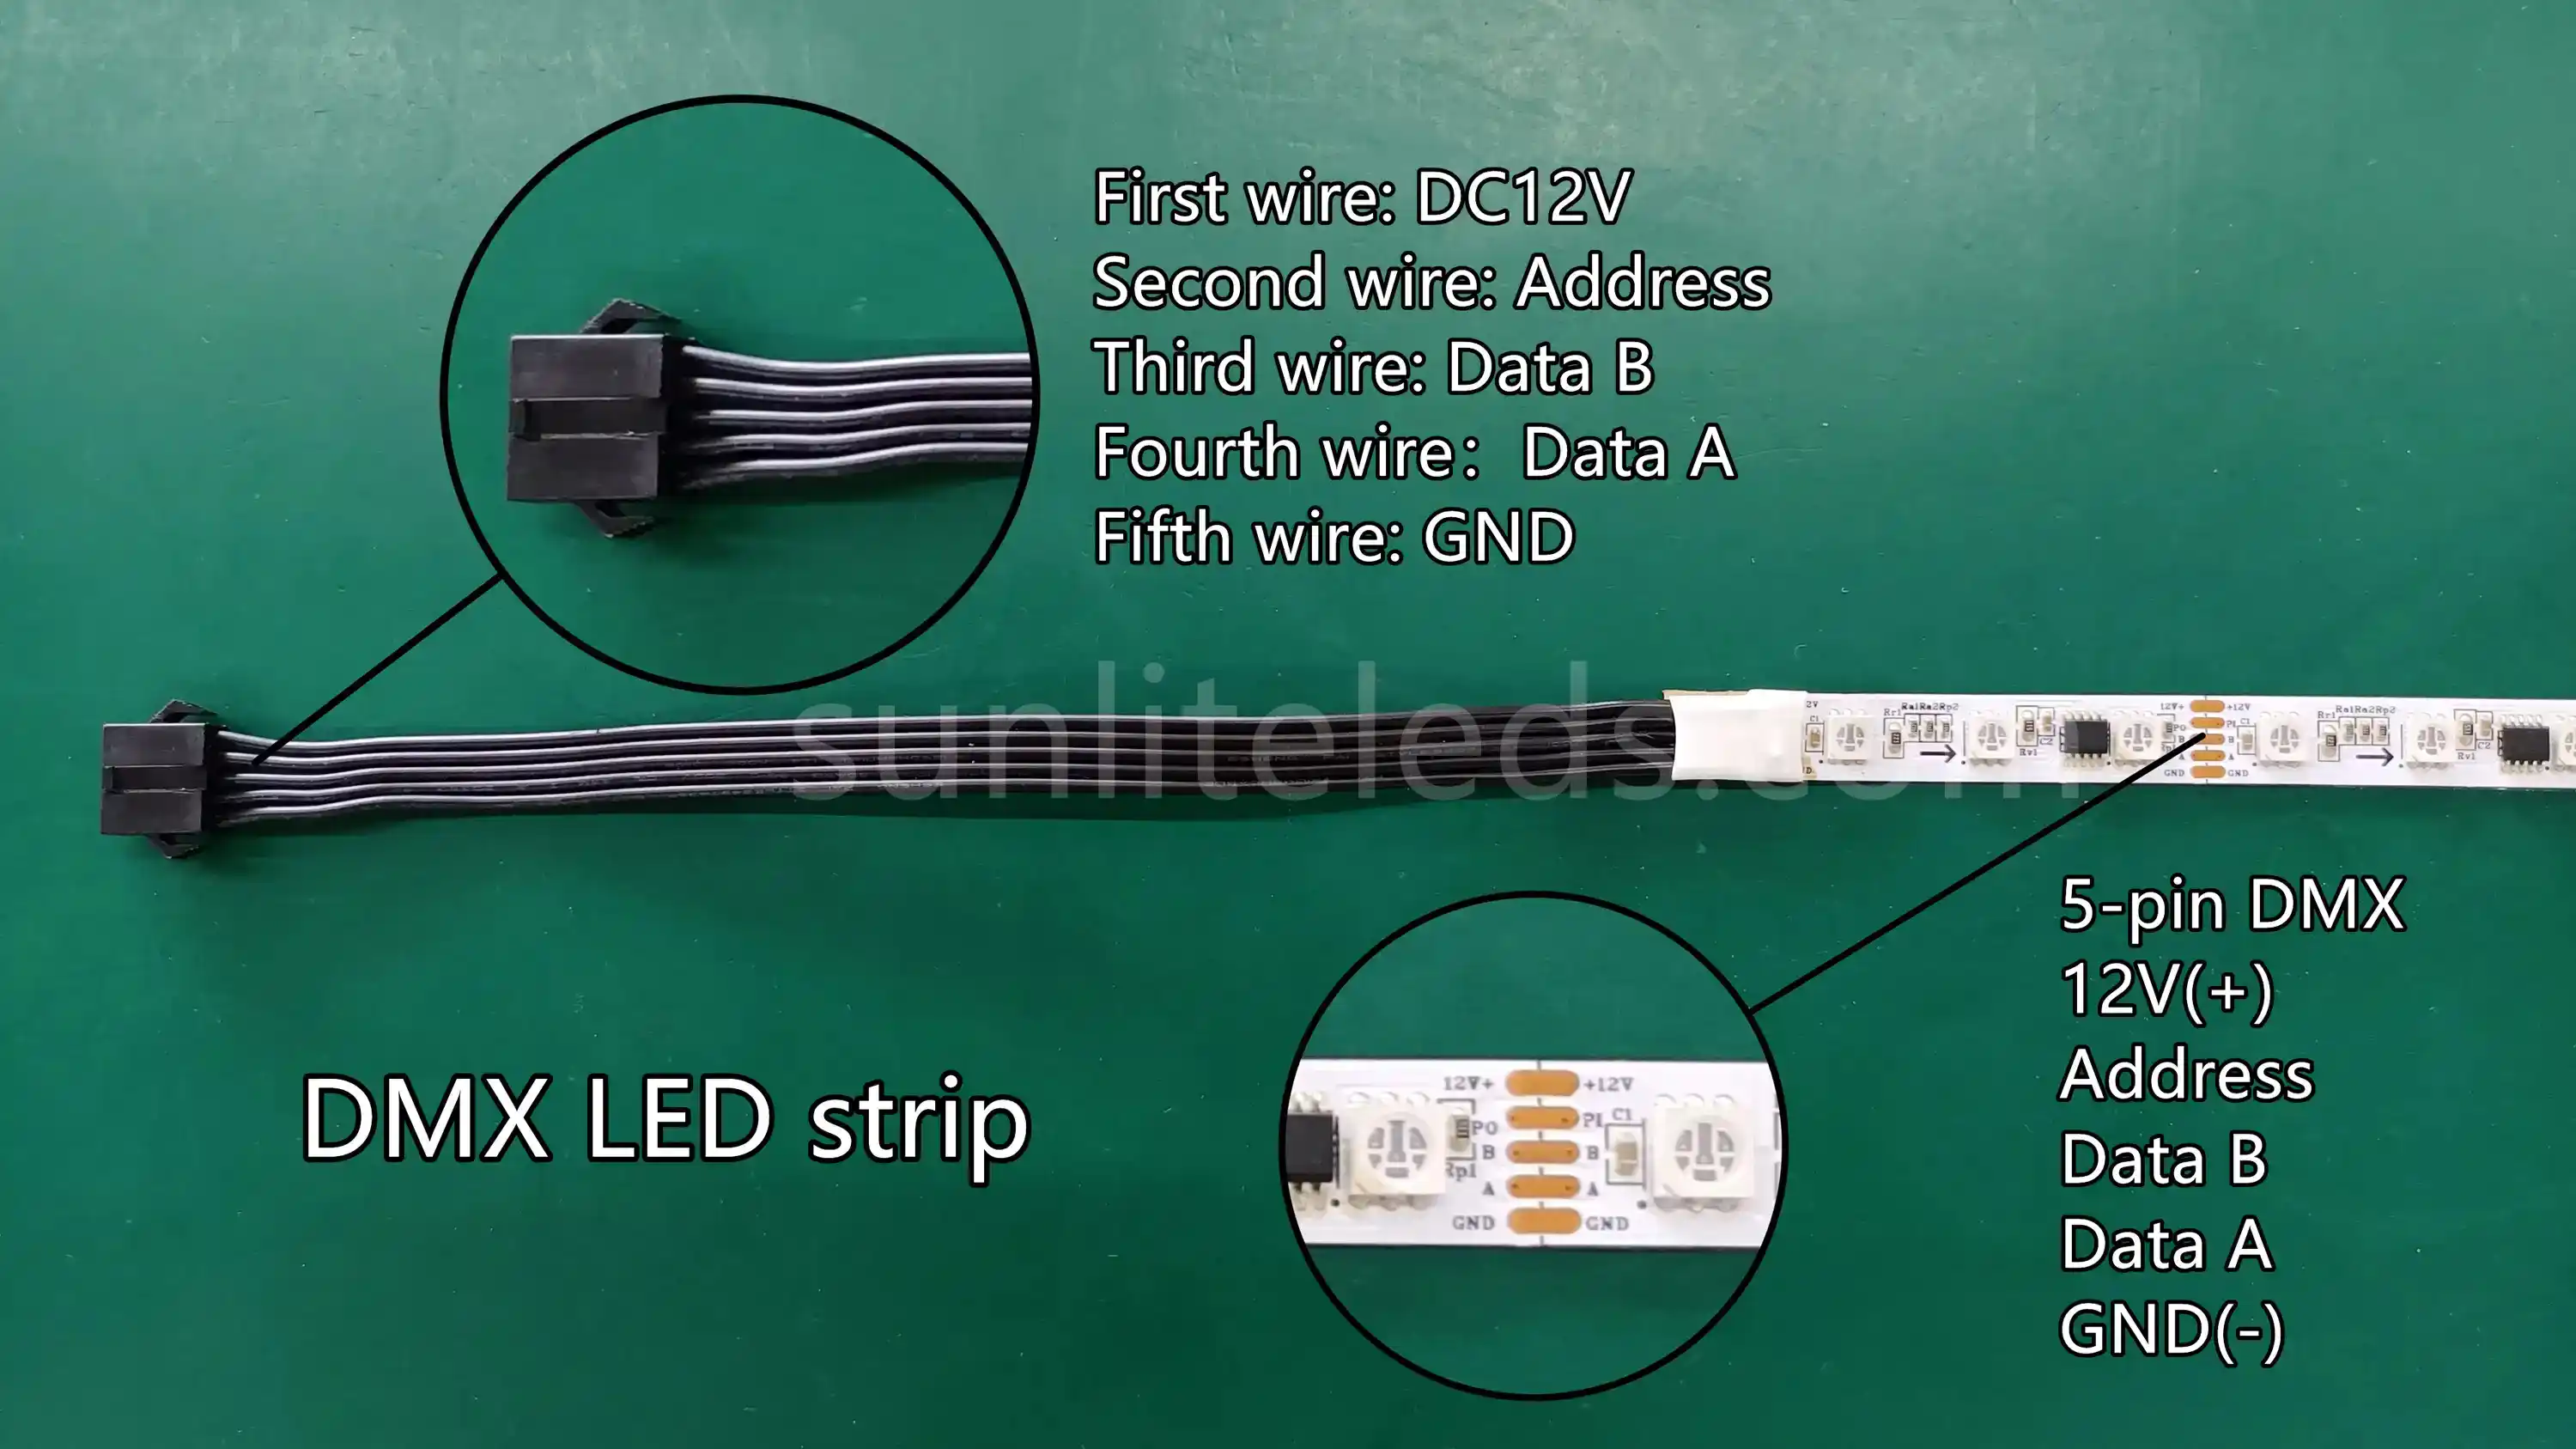
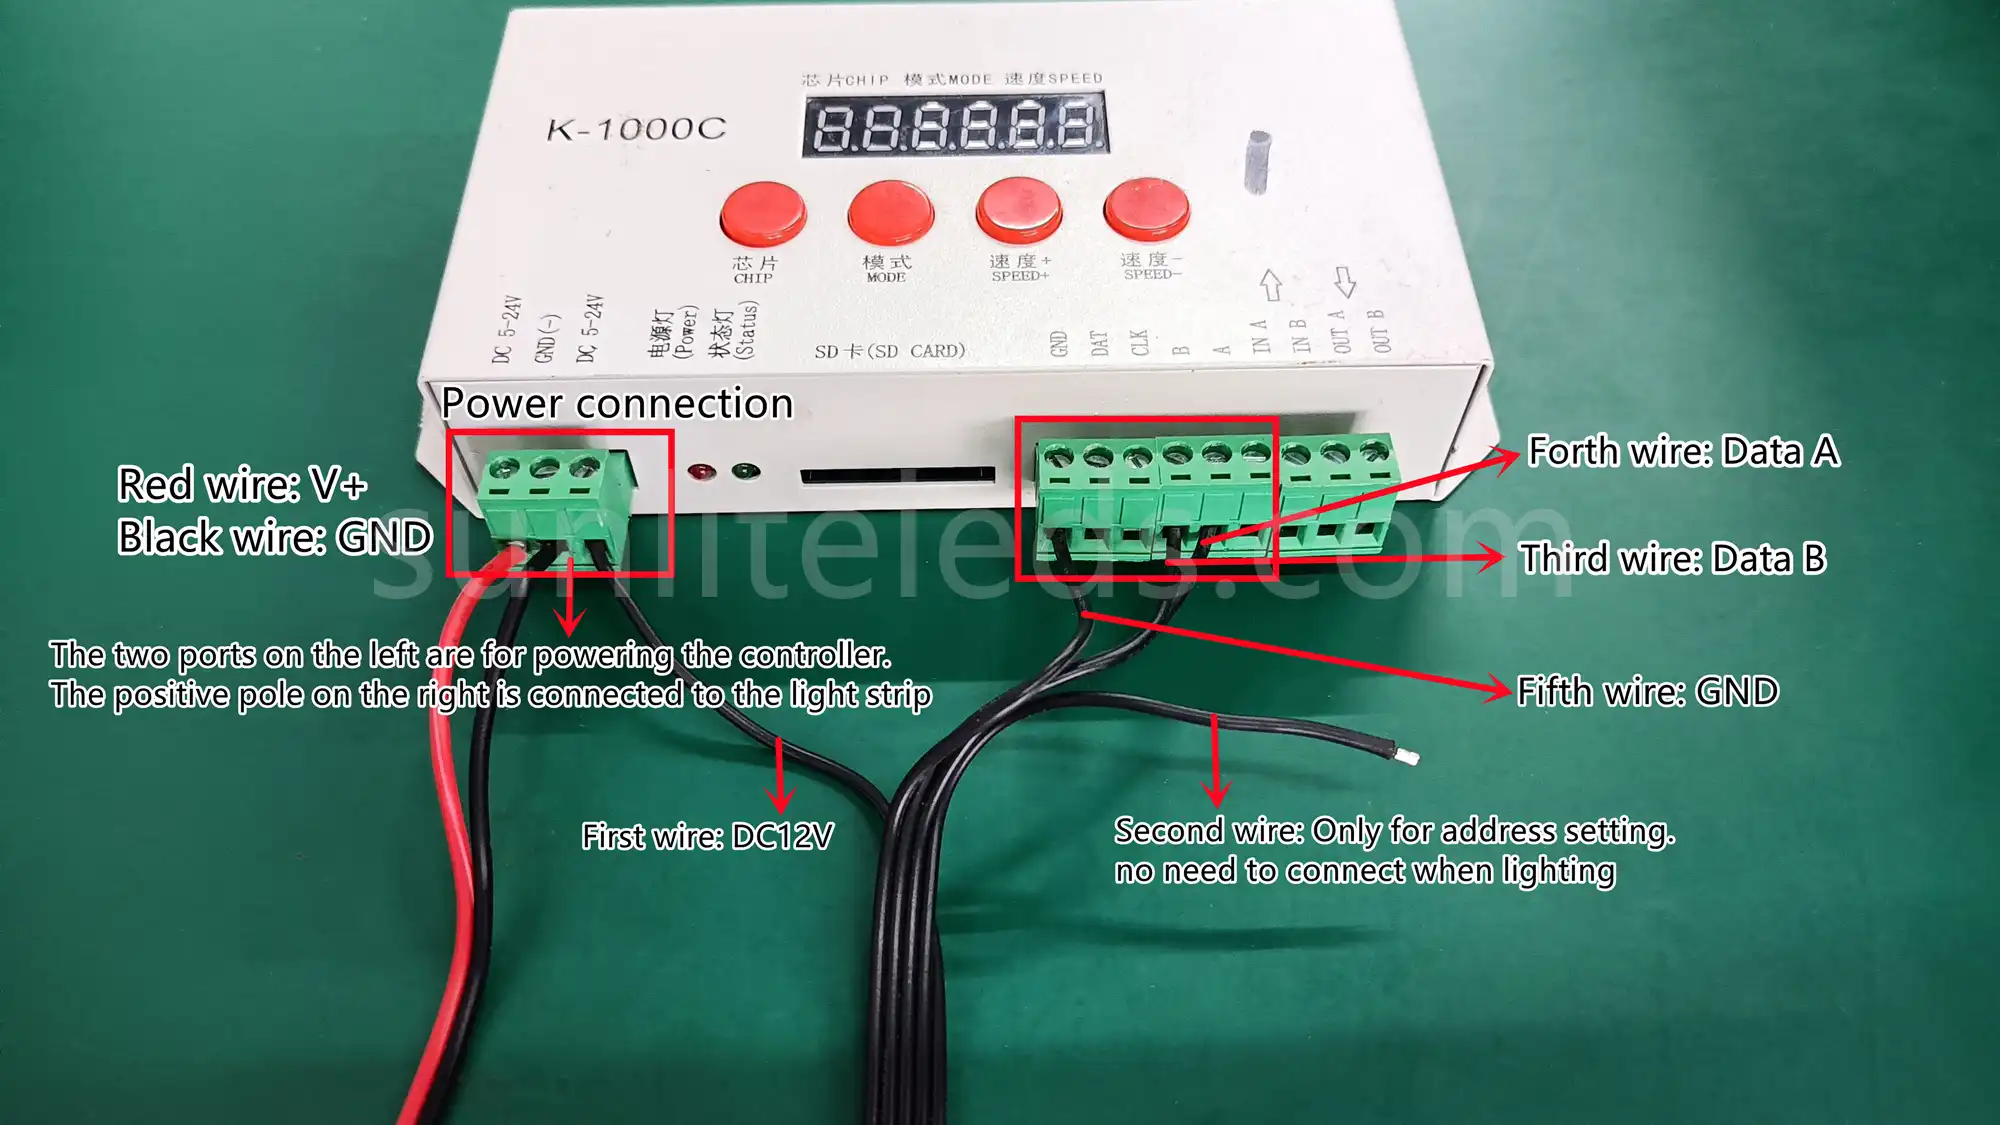
Generally, the DMX LED strips have 5 wires: V+, address, Data A, Data B, and GND. The below picture shows the details of a DV24V DMX RGB LED strip.
Wire
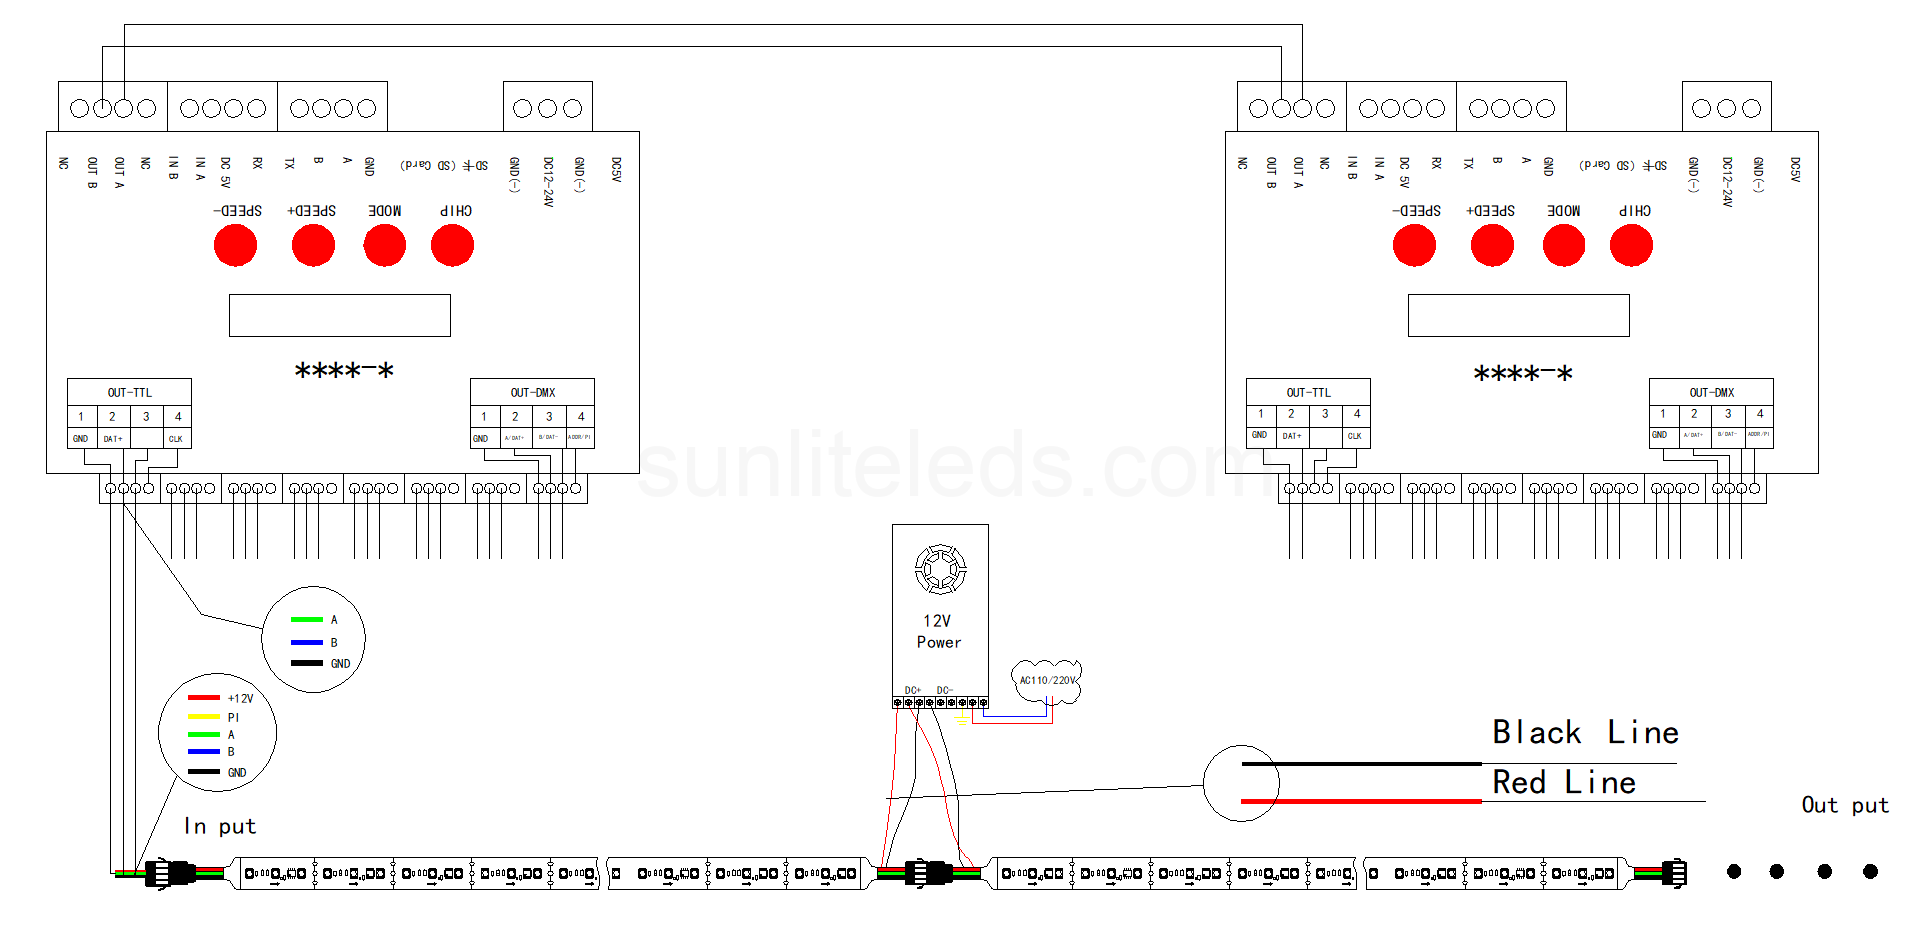
This is a wiring diagram shows how the DMX LED strip connect with K-1000C controller.
Connect
The connection steps of DMX LED strips are similar to the SPI addressable LED strips.
First, prepare a power supply, a controller, and a roll of DMX LED strips. Here we use an adjustable power supply, a K-1000C controller, and a roll of DC24V DMX512 RGB LED strip.
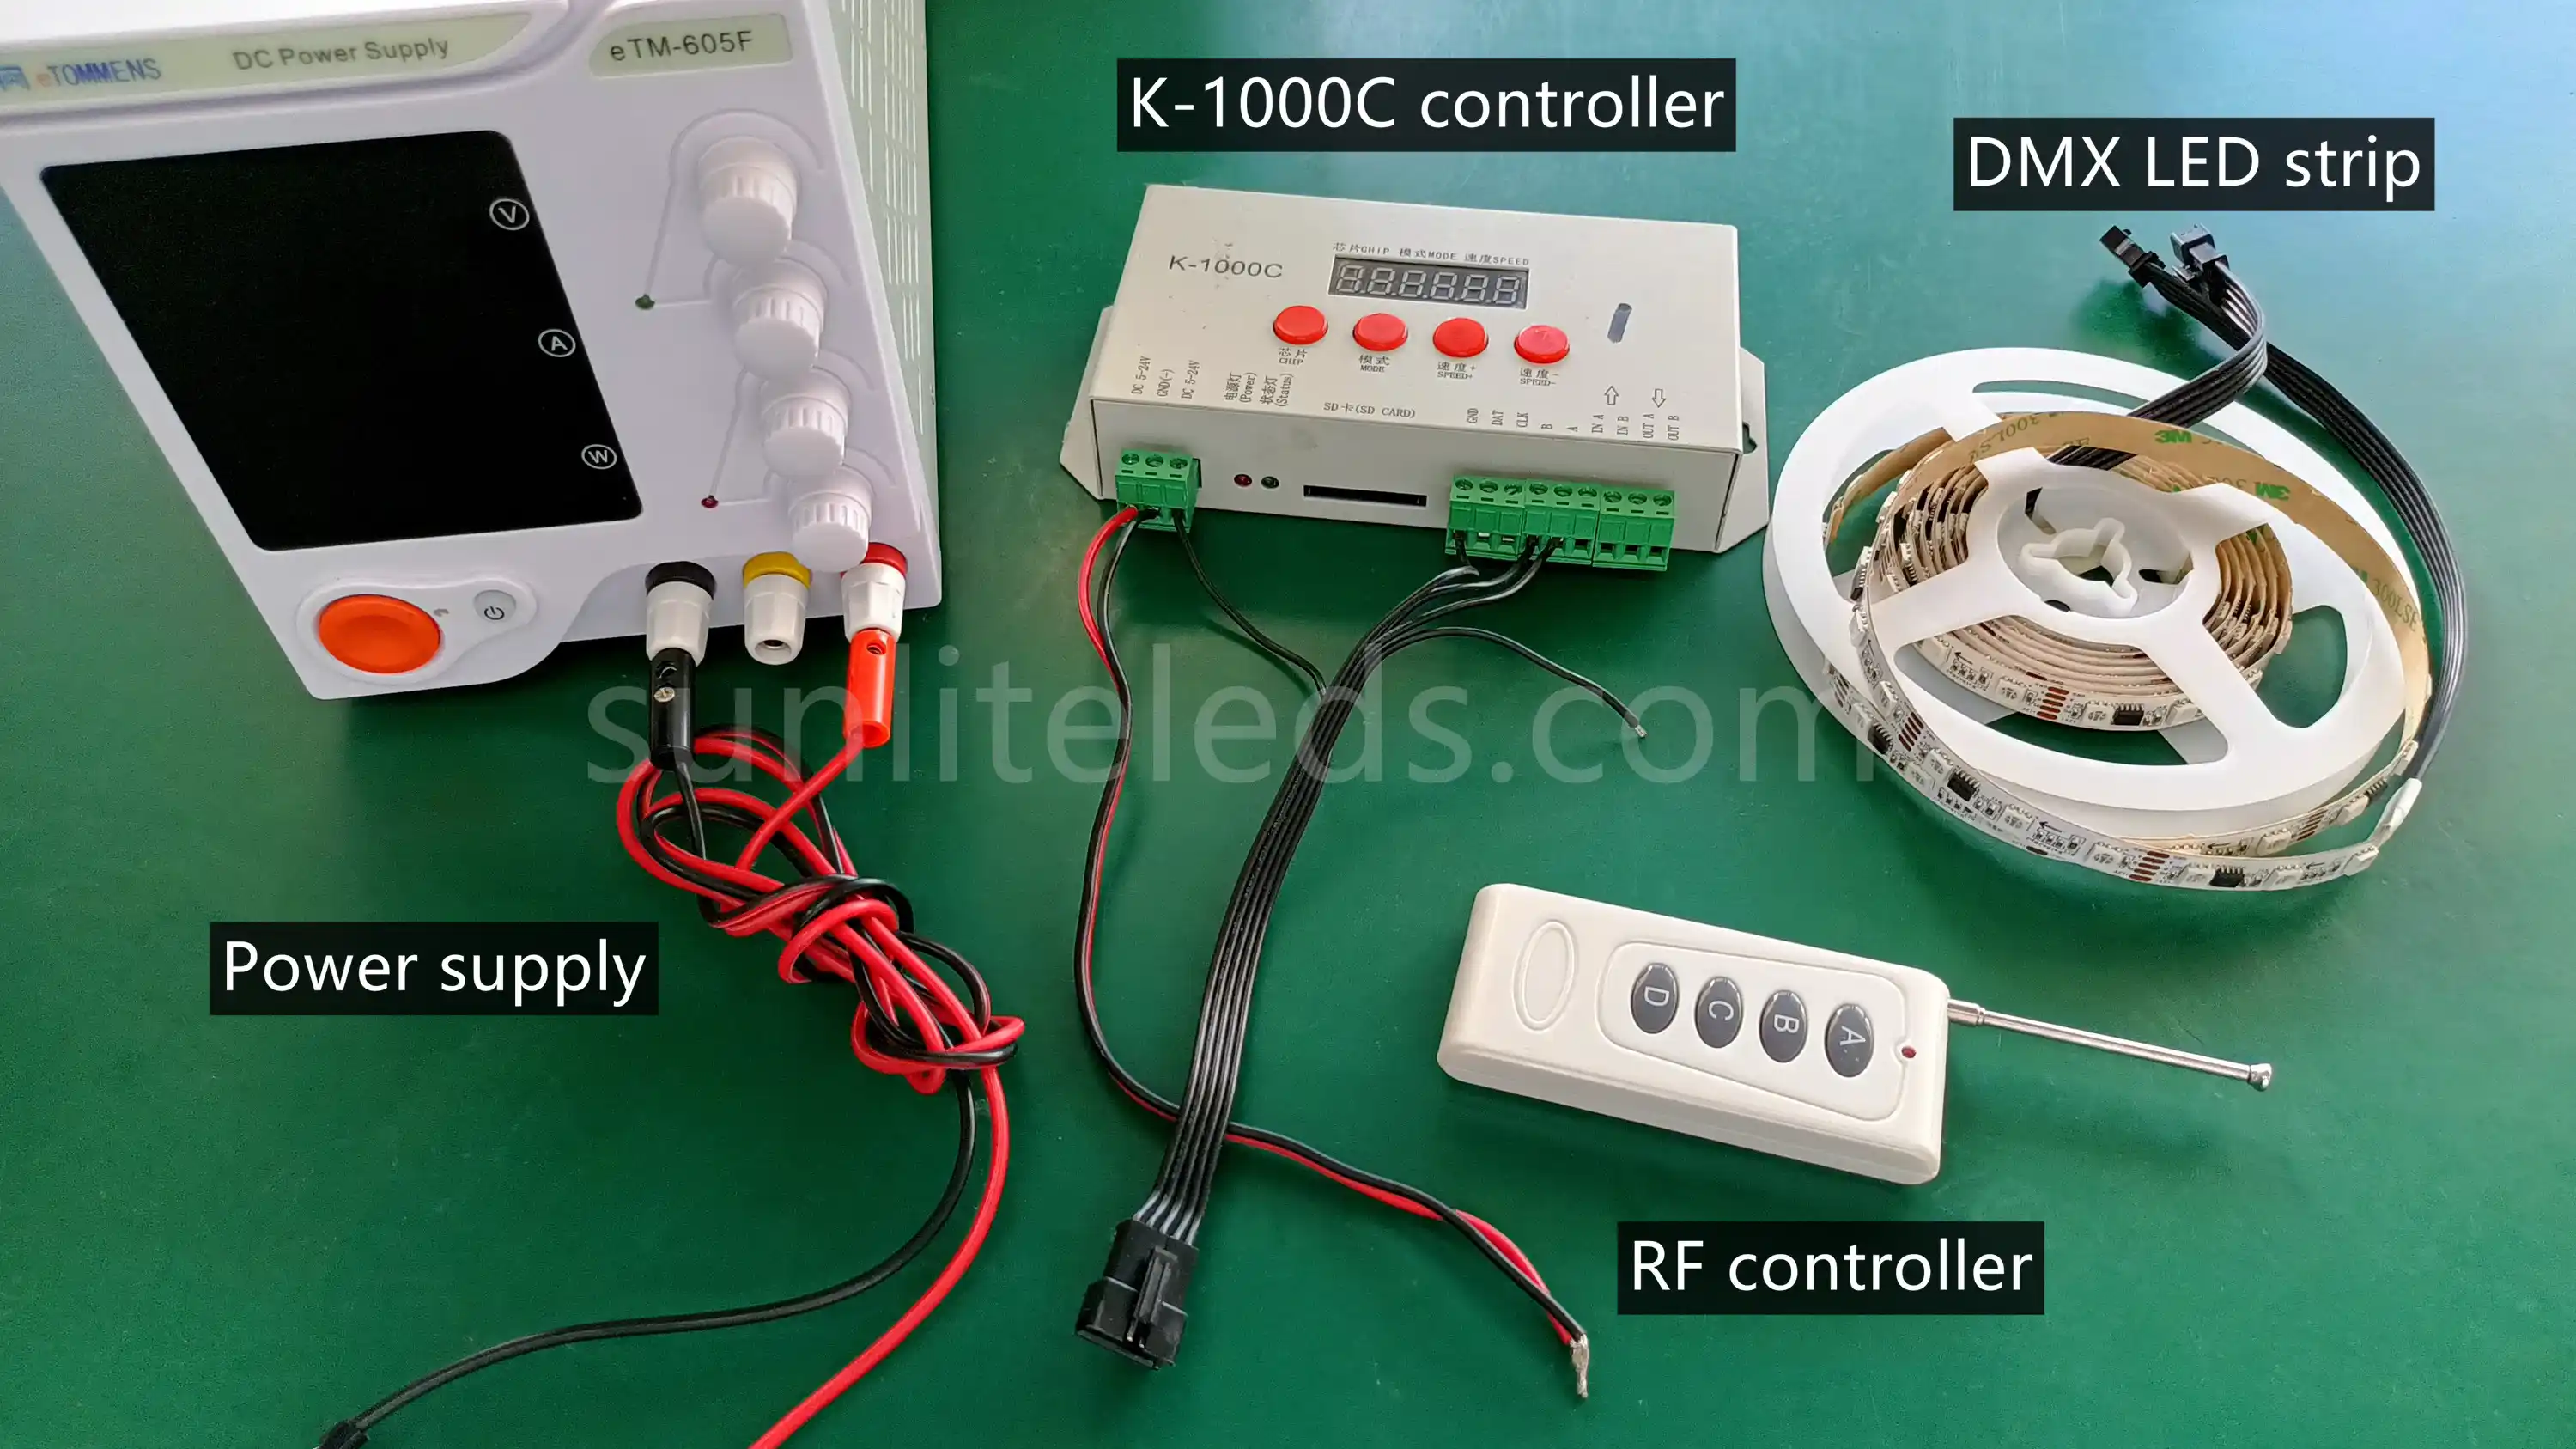
Second, connect the power wire and LED strip connector to the controller. There are 5 cords on the connector, but you just need to connect 4 wires. The second address wire is only for address setting, and we don’t connect it when lighting. Please refer to the following picture to connect:
Third, connect the controller to power supply. Note that the V+ and GND terminals of the power supply and controller port correspond.
Fourth, connect the DMX strip input terminal to the controller. Please check the signal direction before each connection to avoid damage to the strip light caused by reverse signal transmission.

Ok, now the connection work is done. Turn on the power to light up the light strip.
Control
Before controlling DMX LED strip lights, we need to set addresses for each LED strip.
We recommend using XB-C100 code writer for address setting. As for how to set up addresses for DMX LED strips, please check the below video:
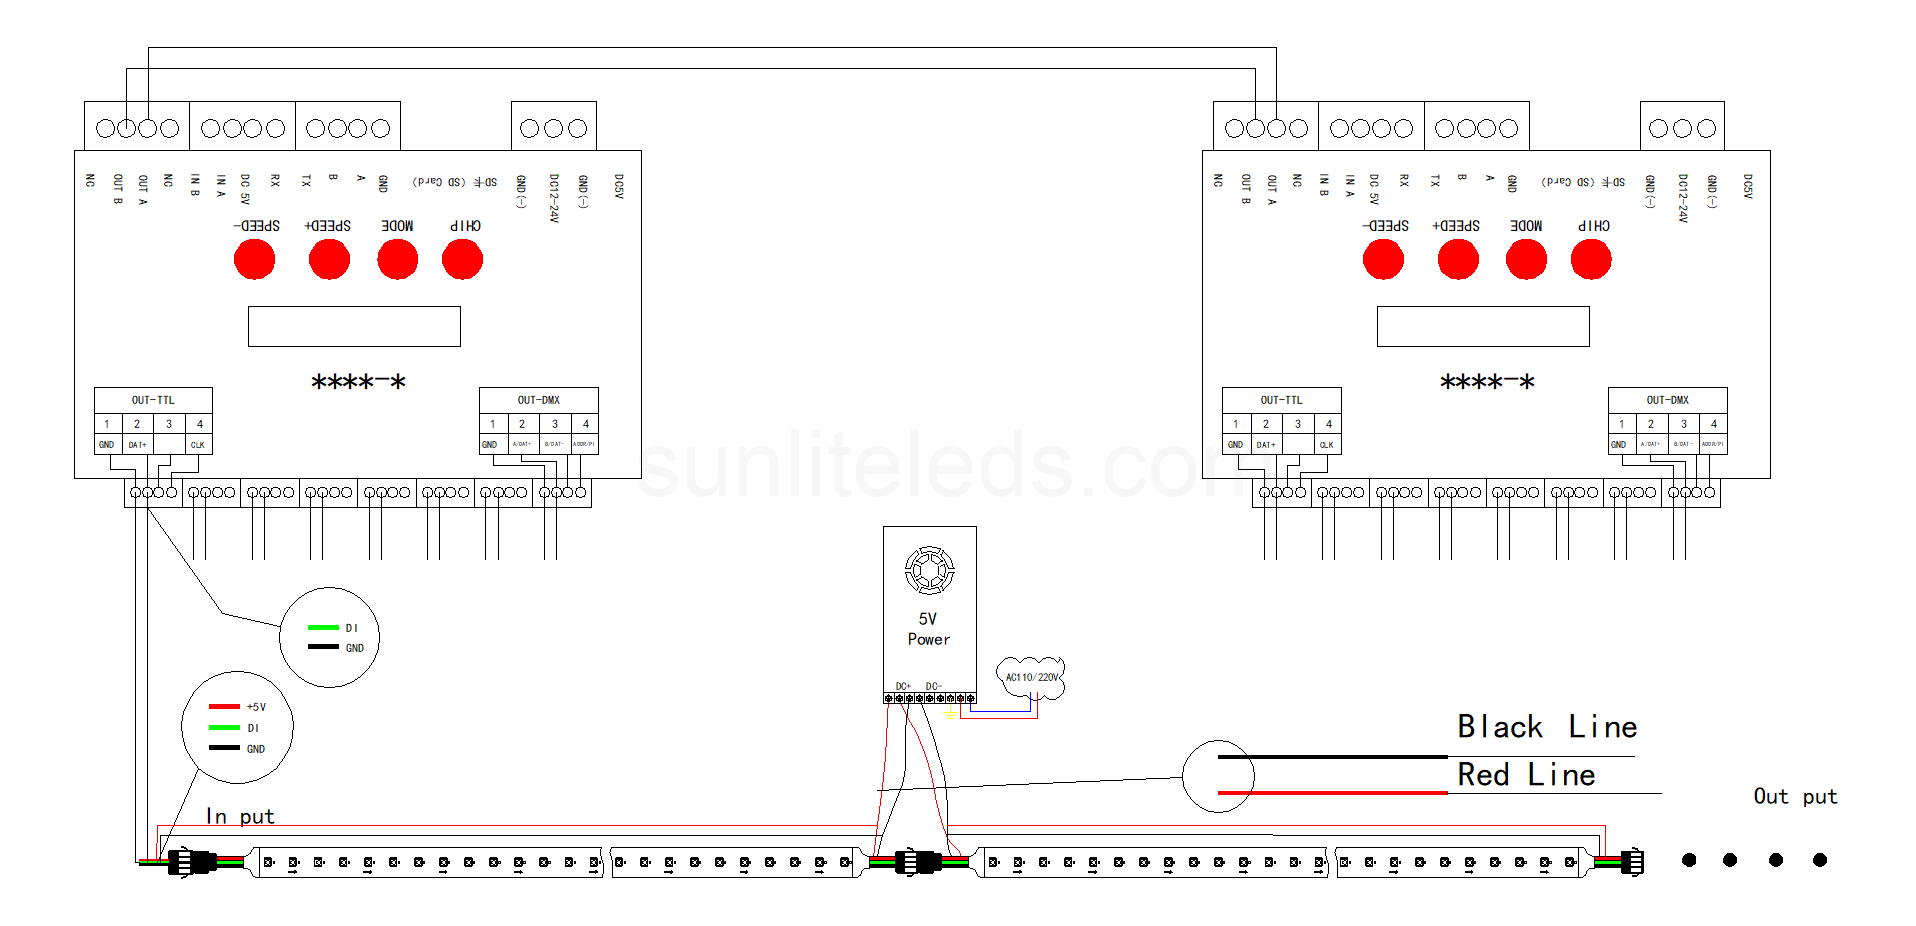
DMX LED strips can be controlled in a number of different ways, the simplest being a single K-1000C offline control like in the example. When the number of pixels exceeds 300, it can be connected with a K-8000C controller or cascaded with K-1000C.
For large lighting projects, you can use the main controller and sub-controller and connect to PC for online control.
The DMX light strip can also use the T-790K controller to connect to Madrix for complex and fine advanced control.
Which control method to choose depends on the control requirements and application scenarios.
Summary
Today, we have introduced how to wire, connect, and control the WS2811, WS2812, WS2813, WS2815, WS2818, SK6812, and DMX LED strip lights. After knowing how to control individually addressable LED strips (WS2812, WS2813, WS2815, SK6812) and non-individual addressable WS2811, WS2818 LED strips, we can almostly master kinds of addressable LED strips well because the connection and control methods are basically similar. Hope this guide can help you get started in the world of pixel LED strip lighting.